Delicious Honey Banana Grilled Cheese Sandwich Recipe
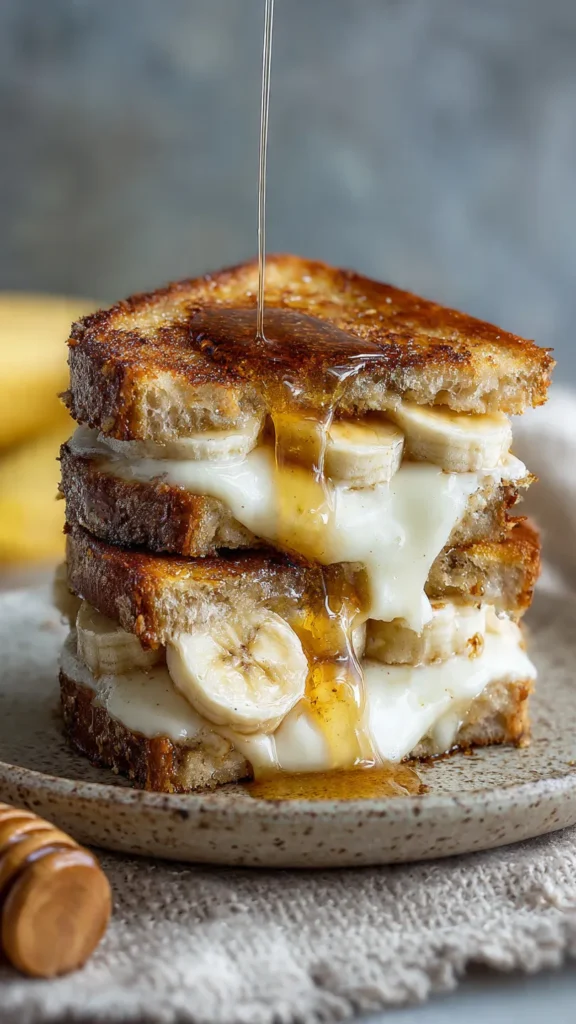
There’s something magical about the combination of sweet and savory flavors melting together in a perfectly grilled sandwich. This Honey Banana Grilled Cheese brings together the creamy richness of melted cheese, the natural sweetness of ripe bananas, and a touch of golden honey to create a comfort food experience that’s both unexpected and utterly delicious. Whether you’re looking for a quick lunch, an indulgent breakfast, or a creative snack that’ll make your taste buds sing, this recipe delivers on all fronts.
What makes this sandwich special is how simple ingredients transform into something extraordinary when combined thoughtfully. The warm, gooey cheese pairs beautifully with soft, caramelized banana slices, while honey adds natural sweetness that enhances rather than overwhelms. A hint of cinnamon and sea salt brings depth and complexity, turning what could be a basic grilled cheese into a gourmet treat you’ll want to make again and again.
Table of Contents
Ingredients You’ll Need
For the sandwich:
- 2 slices whole grain or brioche bread
- 1 ripe banana, thinly sliced
- 2–3 slices mozzarella or mild cheddar cheese
- 1–2 teaspoons honey
- 1/4 teaspoon ground cinnamon (optional)
- 1 tablespoon unsalted butter, softened
- Pinch sea salt (optional)
Choosing Your Ingredients Wisely
The quality of your ingredients directly impacts the final result, so let’s talk about what to look for when shopping for this recipe. Start with your bread selection—this is your foundation. Whole grain bread offers a hearty, nutty flavor and adds nutritional value with its fiber content, making it a wholesome choice. Brioche, on the other hand, brings buttery richness and a slightly sweet taste that complements the honey and banana beautifully. Both work wonderfully, so choose based on your mood and dietary preferences.
When selecting your banana, ripeness matters tremendously. You want a banana that’s ripe but still firm enough to hold its shape when sliced. Look for bright yellow skin with just a few brown spots—this indicates the banana is at peak sweetness without being mushy. Overripe bananas with heavily spotted or brown skin might be too soft and could turn to mush during cooking, while underripe green-tinged bananas lack the natural sweetness that makes this sandwich shine.
For cheese, mozzarella provides a mild, creamy melt that won’t overpower the delicate banana and honey flavors. Its stretchy texture creates those satisfying cheese pulls we all love. Cheddar brings more personality with its sharper taste and golden color, adding a savory contrast that balances the sweetness perfectly. You could even experiment with Gruyère for a nutty flavor or Havarti for extra creaminess. The key is choosing a cheese that melts well and complements rather than competes with the other flavors.
Honey selection also plays a role in your sandwich’s final taste. Wildflower honey offers floral notes and complexity, while clover honey provides a milder, more straightforward sweetness. Raw honey adds nutritional benefits and a more robust flavor profile. Whichever you choose, make sure it’s good quality honey that you’d enjoy eating on its own.
Preparation Steps Explained
Step One: Preparing Your Ingredients
Begin your sandwich-making journey by preparing your banana. Take your ripe banana and slice it into thin, even rounds, approximately 1/4 inch thick. Consistency in thickness is important here because it ensures even cooking—thicker pieces might remain cold in the center while thinner ones could become overly caramelized. Use a sharp knife and a steady hand to create uniform slices. Arrange these slices on a small plate and set them aside where you can easily reach them during assembly.
Next, prepare your cheese. If you’re using pre-sliced cheese, you’re all set. If you’re working with a cheese block, slice it into pieces roughly 1/8 inch thick. Having your cheese ready before you start assembling ensures a smooth, efficient process. Take your butter out of the refrigerator if you haven’t already—it needs to be soft enough to spread easily without tearing your bread. Room temperature butter is your friend here.
Step Two: Buttering Your Bread
This step might seem simple, but proper buttering technique makes the difference between a mediocre grilled cheese and an exceptional one. Take your softened butter and spread it generously on one side of each bread slice. The butter should cover the entire surface right to the edges—this creates an even, golden crust without any pale spots. Don’t be stingy with the butter, as it’s what gives your sandwich that irresistible crispy exterior and rich flavor.
Here’s a pro tip that elevates your sandwich: spread a thin layer of butter on the inside of one slice as well. This internal buttering adds an extra dimension of flavor and helps the ingredients bond together. The butter melts slightly during cooking, infusing the bread with richness and helping prevent the banana from making the bread soggy.
Step Three: Building Your Sandwich
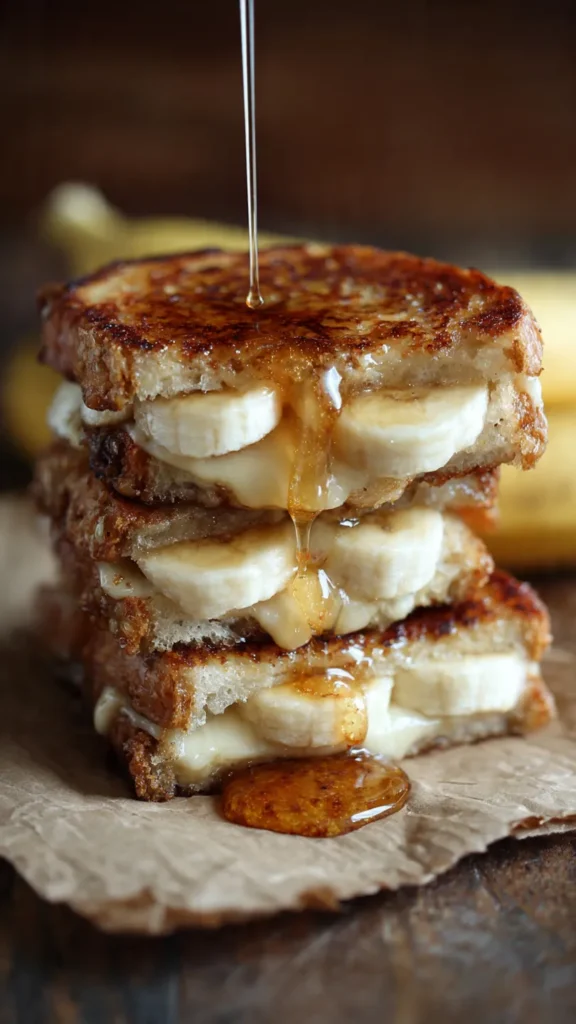
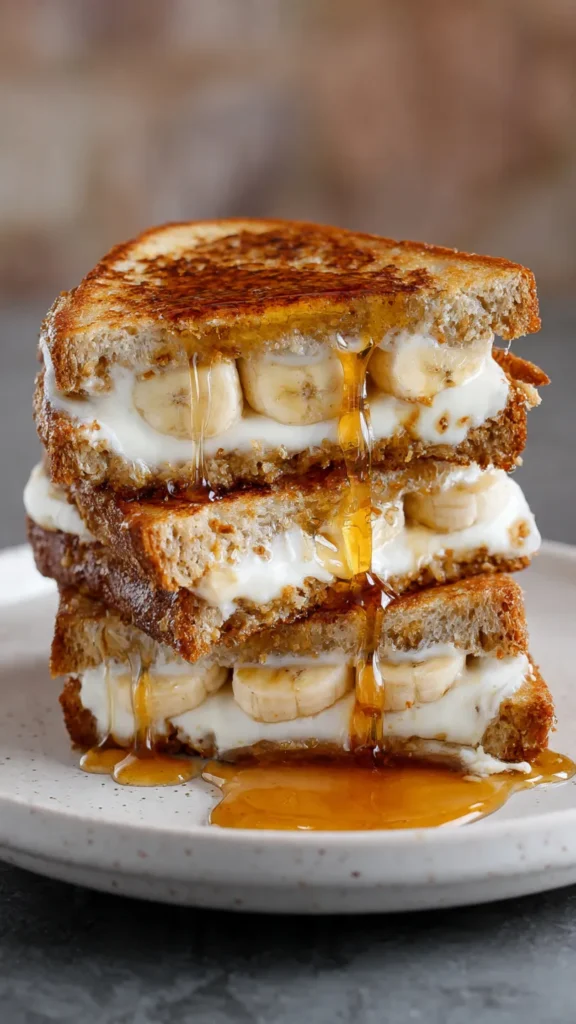
Now comes the fun part—layering your ingredients. Place one slice of bread on your work surface with the buttered side facing down. Start with your cheese slices, laying them flat across the bread. The cheese acts as a protective barrier between the bread and the moist banana, helping maintain the bread’s texture while creating that coveted melted cheese effect.
Next, arrange your banana slices in a single layer over the cheese. Try to distribute them evenly without too much overlap, ensuring every bite contains banana. Now drizzle your honey over the bananas in a zigzag pattern. Don’t go overboard—1 to 2 teaspoons is plenty. Too much honey can make the sandwich overly sweet and create a sticky situation in your pan.
If you’re using cinnamon, sprinkle it lightly over the honey and bananas. A little goes a long way, and you want just enough to add warmth and spice without overwhelming the other flavors. A tiny pinch of sea salt at this stage might seem unusual, but it’s brilliant—salt enhances sweetness and adds complexity that makes your taste buds pay attention.
Place your second slice of bread on top, buttered side facing outward. Press down gently to help everything stick together. You’ve just created a flavor masterpiece ready for the skillet.
Step Four: Grilling to Perfection
Temperature control is crucial for grilled cheese success. Place your skillet over medium-low heat and let it warm up for about a minute. You want the pan hot enough to toast the bread and melt the cheese but not so hot that the outside burns before the inside has a chance to get gooey and warm.
Carefully place your assembled sandwich in the preheated skillet. Cover it with a lid—this creates a mini oven environment that helps the cheese melt more quickly and evenly. The trapped heat circulates around the sandwich, warming everything through without requiring you to flip it constantly.
Let the sandwich cook undisturbed for 2 to 3 minutes. You’ll start to smell the butter browning and might hear gentle sizzling. After this time, carefully lift the sandwich with your spatula to check the underside. You’re looking for a beautiful golden-brown color with perhaps a few darker spots where the butter caramelized. If it’s not quite there yet, give it another 30 seconds to a minute.
When the first side reaches that perfect golden hue, it’s time to flip. Use a wide spatula to support the entire sandwich, flip it confidently in one smooth motion, and cover it again. Press down gently with your spatula—this helps ensure good contact with the pan and encourages even browning. The gentle pressure also helps the melting cheese spread throughout the sandwich.
Cook the second side for another 2 to 3 minutes, checking occasionally to prevent burning. The cheese should be fully melted, creating stretchy strings when you eventually cut into it. The banana slices will soften and warm, their natural sugars caramelizing slightly against the hot cheese.
Step Five: The Final Touch
Once both sides are golden and the cheese has melted completely, transfer your sandwich to a cutting board. This is where patience pays off—resist the urge to cut into it immediately. Let the sandwich rest for about a minute. This brief waiting period allows the melted cheese to set slightly, making the sandwich easier to cut cleanly without all the filling sliding out. The ingredients also continue cooking slightly from residual heat, ensuring everything is perfectly warm throughout.
After resting, slice your sandwich diagonally with a sharp knife. The diagonal cut isn’t just for presentation—it creates two triangular pieces that are easier to hold and eat, and it showcases the beautiful layers inside. Watch as the cheese stretches between the two halves, revealing the caramelized banana and golden bread interior.
Serving Suggestions and Variations
This sandwich is delicious on its own, but you can elevate the experience with thoughtful accompaniments. Serve it alongside fresh fruit like strawberries or apple slices for a balanced meal. A handful of mixed greens dressed lightly with lemon vinaigrette provides a refreshing contrast to the rich sandwich. For breakfast, pair it with a cup of hot coffee or tea. The sandwich also works wonderfully with a cold glass of milk or a fruit smoothie.
Feel free to experiment with variations. Try adding a thin spread of almond butter or peanut butter on the inside for extra protein and nutty flavor. Sprinkle some crushed walnuts or pecans over the banana for added crunch. Swap the cinnamon for cardamom or nutmeg to change the flavor profile. You could even add thin apple slices alongside the banana for more fruit complexity.
For a more indulgent version, drizzle a little caramel sauce along with the honey, or use cream cheese as your base instead of mozzarella. The possibilities are endless, and each variation offers a new taste experience while maintaining the core magic of sweet, savory, and melted cheese perfection.
Storage and Make-Ahead Tips
This sandwich is best enjoyed fresh and hot off the skillet, but if you need to prepare components ahead, you can slice your banana and store it in an airtight container with a squeeze of lemon juice to prevent browning. Keep it refrigerated for up to a day. The assembled sandwich doesn’t store well uncooked, as the honey and banana moisture can make the bread soggy.
If you have leftovers, you can reheat the sandwich in a dry skillet over low heat or in a toaster oven, though it won’t be quite as crispy as when freshly made. The best approach is to make these sandwiches to order, which only takes about 10 minutes from start to finish anyway.
This Honey Banana Grilled Cheese Sandwich proves that simple ingredients, when combined with care and attention to technique, can create something truly special. It’s comfort food that feels like a treat, everyday ingredients that taste extraordinary, and a recipe that’ll quickly become a household favorite.