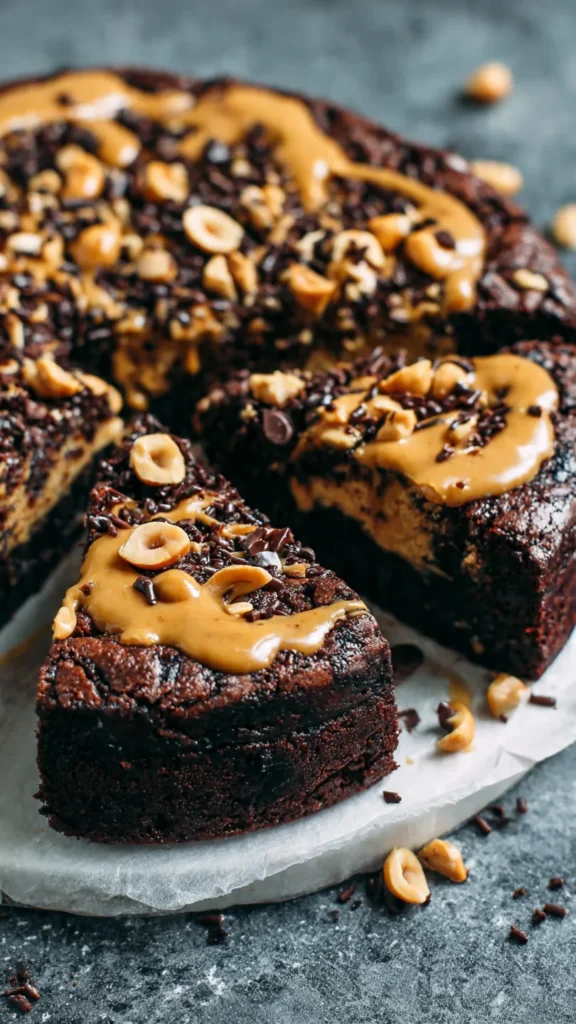
Chocolate Peanut Butter Ooey Gooey Cake
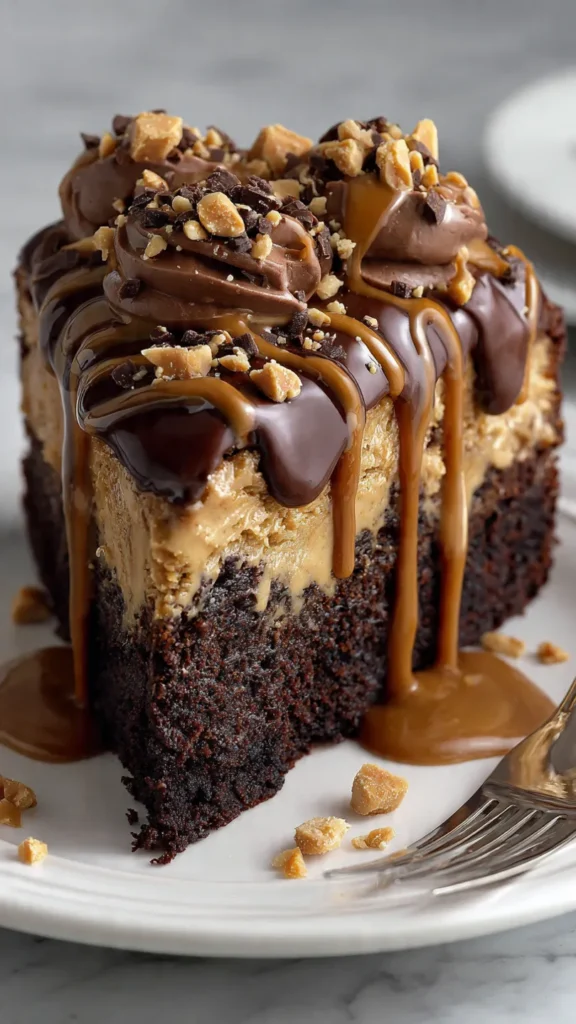
Some desserts are simply good. Others stop conversation mid-bite and make people ask for the recipe before they’ve even finished their slice. This Chocolate Peanut Butter Ooey Gooey Cake belongs firmly in the second category—a rich, molten masterpiece that combines two iconic flavors into one unforgettable dessert experience.
The magic of chocolate and peanut butter needs no introduction. This legendary pairing has dominated candy aisles, ice cream shops, and dessert menus for generations. When you bring these flavors together in an ooey gooey cake format, something extraordinary happens. The result is a warm, soft, intensely satisfying dessert that tastes like it came from a high-end bakery, yet comes together with remarkable ease.
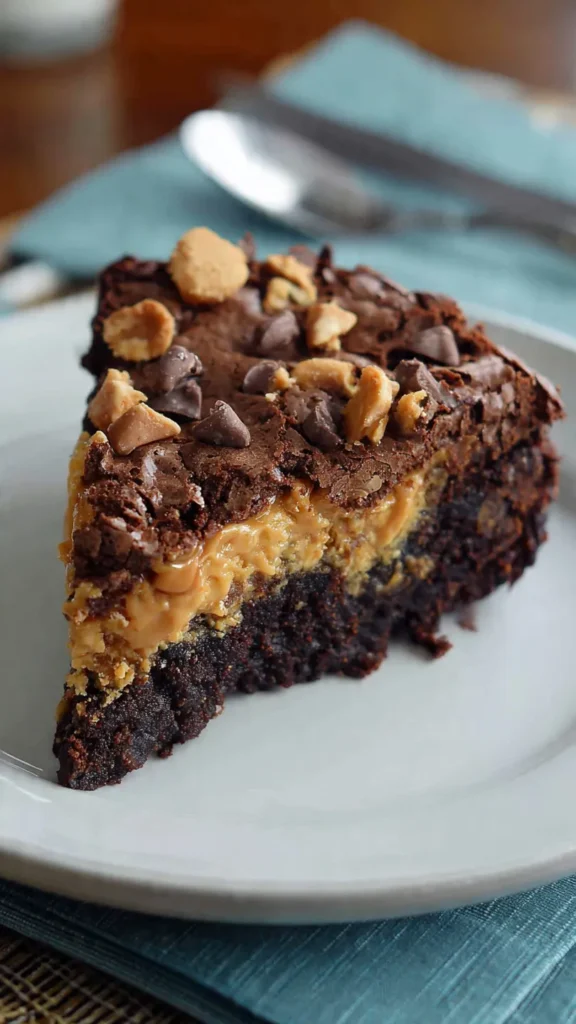
This isn’t your typical layer cake. The genius lies in its simplicity and texture contrast. A dense, fudgy chocolate base—made from just three ingredients—provides the foundation. Above it, a creamy peanut butter filling transforms during baking into a custard-like layer that’s shiny, gooey, and irresistibly soft. The edges develop a delicate crispness while the center remains molten and spoon-worthy.
Whether you’re preparing dessert for a holiday celebration, birthday party, potluck dinner, or creating content for your food blog, this cake delivers every single time. It photographs beautifully with its glossy top and visible layers, slices cleanly despite its gooey nature, and uses ingredients you probably already have in your pantry. Best of all? Leftovers are a myth with this recipe—people come back for seconds, then thirds.
Table of Contents
What Creates That Signature Ooey Gooey Texture?
The showstopping texture comes from a carefully balanced combination of cream cheese, peanut butter, powdered sugar, and eggs. When baked until just barely set, this mixture creates a filling that’s soft, molten, and almost custard-like in consistency. Meanwhile, the chocolate base transforms into something wonderfully dense and brownie-adjacent.
The secret is precise baking time. You want the edges to set and the surface to develop that characteristic crackled appearance, but the center should remain soft and jiggly. This cake isn’t meant to be light, airy, or traditionally cake-like. Instead, it’s intentionally moist, heavy, decadent, and deeply satisfying—a dessert that announces its indulgence proudly.
Ingredients You’ll Need
Chocolate Cake Base
- 1 box chocolate cake mix (15–16 oz, any brand)
- 1 large egg
- ½ cup unsalted butter, melted
Peanut Butter Ooey Gooey Layer
- 8 oz cream cheese, softened to room temperature
- 1 cup creamy peanut butter
- 3 cups powdered sugar
- 2 large eggs
- 1 teaspoon vanilla extract
Essential Equipment
- 9×13-inch baking dish
- Electric mixer or hand mixer
- Mixing bowls (medium and large)
- Rubber spatula
- Nonstick cooking spray or parchment paper
Complete Step-by-Step Instructions
Building the Chocolate Foundation
Preheat your oven to 350°F (175°C). Prepare your 9×13-inch baking dish by greasing it thoroughly or lining it with parchment paper for easier removal and slicing.
In a medium bowl, combine the chocolate cake mix, melted butter, and one egg. Mix until a thick, sticky dough forms. This mixture won’t resemble traditional cake batter—it’s much denser and more cohesive, almost like cookie dough. This consistency is exactly what you want because it creates that chewy, brownie-like base layer.
Transfer the chocolate dough to your prepared baking dish. Using your fingers or the back of a spatula, press the dough evenly across the bottom of the pan. Take your time to ensure consistent thickness from edge to edge, paying special attention to the corners. Set this aside while you prepare the star of the show.
Creating the Peanut Butter Filling
In a large bowl, beat the softened cream cheese with an electric mixer until it’s completely smooth and fluffy, about 2 minutes. Add the peanut butter and continue mixing until the two ingredients are fully incorporated and the mixture is uniform in color and texture. You shouldn’t see any streaks or lumps.
Add the eggs and vanilla extract, beating until they’re fully combined into the peanut butter mixture. Now comes the powdered sugar—add it gradually, one cup at a time, mixing well after each addition. This prevents clumping and ensures a silky-smooth filling. The final mixture should be thick, creamy, and pourable with a beautiful sheen.
This filling is intentionally sweet and rich. During baking, it undergoes a transformation, becoming that signature gooey layer that gives this cake its name and its reputation.
Assembly and Baking
Pour the peanut butter mixture over the pressed chocolate base. Use a rubber spatula to spread it evenly, making sure it reaches every corner and edge of the pan. Don’t worry about the two layers mixing—they’ll remain beautifully distinct during baking, creating that stunning visual contrast when you slice into it.
Place the cake in your preheated oven and bake for 40–45 minutes. Here’s where attention matters: the center should remain gooey and soft, so resist the urge to overbake. The edges will look set and slightly puffed, possibly developing some golden-brown coloring. The middle might jiggle slightly when you gently shake the pan—this is perfect.
Remove the cake from the oven and let it cool for at least 20–30 minutes before cutting. This cooling period allows the gooey layer to set just enough for clean slicing while maintaining that molten center.
Time Investment and Nutrition
Prep Time: 15 minutes
Baking Time: 40–45 minutes
Cooling Time: 20 minutes
Total Time: Approximately 1 hour 20 minutes
Estimated Calories: Each square (based on 15 servings) contains approximately 350–420 calories, depending on your cake mix brand and the specific peanut butter used.
Flavor and Texture Profile
The chocolate layer delivers deep, rich cocoa flavor with a texture similar to the best fudge brownies you’ve ever had. Dense, chewy, and intensely chocolatey, the melted butter enriches every bite while helping the layer maintain its structure.
The peanut butter layer is where the magic happens. Creamy, molten, and custard-like in the center, it develops slight caramelization around the edges that adds complexity. The peanut butter contributes a beautiful savory richness and subtle saltiness that perfectly balances the sweetness from the powdered sugar.
Together, these layers create an extraordinary textural experience—soft and gooey, dense and creamy, with just enough crispness around the edges to provide contrast.
Creative Variations to Try
Chunky Peanut Butter Version: Replace creamy peanut butter with chunky variety to add delightful peanut pieces throughout the topping layer.
Chocolate Chip Enhancement: Fold ½ to 1 cup of chocolate chips into either the base layer or the peanut butter filling for extra chocolate intensity.
Sweet and Salty Pretzel: Sprinkle crushed salted pretzels over the top before baking for an addictive sweet-salty combination.
Reese’s Lover’s Dream: Scatter chopped peanut butter cups across the surface immediately after removing from the oven. They’ll soften perfectly from the residual heat.
Elegant Ganache Finish: Allow the cake to cool completely, then drizzle with chocolate ganache for a bakery-worthy presentation.
Serving Suggestions for Maximum Impact
Serve this cake warm to experience the full gooey effect. A scoop of vanilla ice cream or dollop of cold whipped cream provides a temperature contrast that elevates every bite.
For gatherings and parties, cut the cake into smaller squares. The richness means generous portions aren’t necessary—these smaller servings will still satisfy while allowing guests to sample other desserts.
For visual appeal, lightly dust the cooled cake with powdered sugar or create elegant chocolate drizzle patterns across the top using melted chocolate in a piping bag.
Expert Tips for Perfect Results
Never overbake. The gooey layer must remain soft, shiny, and molten. If baked until completely firm, you’ll lose the signature texture that makes this cake special.
Bring cream cheese to room temperature. Cold cream cheese creates lumps that compromise the smooth, creamy texture you’re aiming for.
Consider lining your pan. Parchment paper makes lifting the entire cake easier, resulting in cleaner, more professional-looking slices.
Add powdered sugar gradually. This simple step prevents clumping and ensures the filling remains smooth and lump-free.
Allow adequate cooling time. The cake is extremely soft and delicate when hot. A brief rest period helps the structure stabilize while maintaining that gooey center.
Storage and Make-Ahead Options
Room Temperature: Store tightly covered for 1–2 days. The gooey texture remains optimal during this window.
Refrigerator: Keeps for up to 5 days when properly covered. The cake becomes firmer when chilled—warm individual slices in the microwave for 10–15 seconds to restore that gooey consistency.
Freezer: Freeze individual slices wrapped in plastic wrap and stored in freezer bags for up to 2 months. Thaw at room temperature, then warm briefly before serving.
Why This Recipe Excels for Content Creation
This cake possesses every quality that drives engagement on food blogs and social media platforms. The glossy, crackled top and thick gooey center photograph exceptionally well in both natural light and styled settings. Chocolate and peanut butter combinations consistently generate high engagement rates and shares.
The accessible ingredient list appeals to home bakers who want impressive results without specialty items. The distinct layers create visual interest in both photos and videos, making this recipe ideal for step-by-step content. Plus, the recipe adapts easily to seasonal variations and themed presentations, giving you content versatility throughout the year.
Common Questions Answered
Can I use homemade chocolate cake batter? You can, though the texture will shift toward traditional cake rather than the dense, brownie-style base that makes this recipe unique.
Will natural peanut butter work? It’s not recommended. Natural peanut butter tends to separate and won’t provide the stable, gooey texture you need.
Can I make this in a smaller pan? Absolutely. Halve the recipe and use an 8×8-inch pan, baking for 30–35 minutes.
How do I create a marbled effect? Use a butter knife to gently swirl the peanut butter topping into the chocolate base before baking for a beautiful marbled appearance.
Final Thoughts
Chocolate Peanut Butter Ooey Gooey Cake represents dessert indulgence at its finest. Simple enough for weeknight baking yet impressive enough for special occasions, this cake satisfies intense chocolate-peanut butter cravings while looking absolutely stunning on the plate. That soft, warm, gooey texture is the signature element that keeps people coming back, and once someone takes their first bite, they’ll understand exactly why this recipe has earned its devoted following.