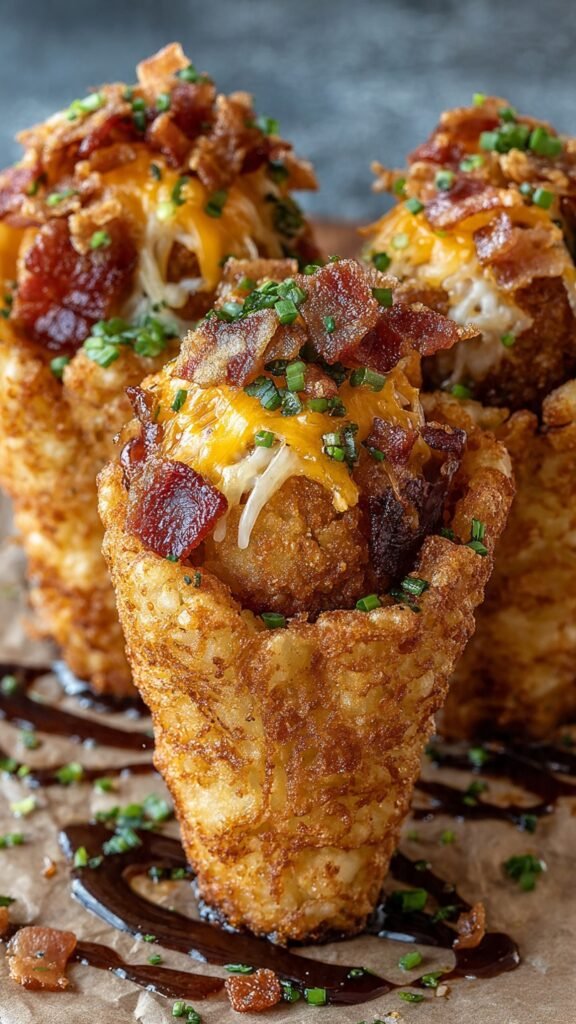
Bacon Cheeseburger Stuffed Tater Tot Cones (Crispy, Cheesy, and So Fun!)

Imagine taking everything you love about a loaded bacon cheeseburger and serving it inside a crispy, golden tater tot cone you can hold in one hand. The first bite is pure fun—your teeth crack through the crunchy potato shell, then sink into a juicy, cheesy bacon-beef filling with tangy burger sauce and melty cheddar. It’s like fair food, game-day snacks, and comfort dinner all rolled into one over-the-top creation.
These Bacon Cheeseburger Stuffed Tater Tot Cones are the kind of recipe that makes people stop, stare, and immediately ask, “How did you make that?” They’re playful enough for parties, but hearty enough to serve as a full meal, especially with a simple side salad or some extra veggies. The best part is that while they look impressive and a little outrageous, the steps are actually straightforward once you understand how to form and bake the cones.
You’ll get crispy potato cones that hold their shape, stuffed with a rich, savory bacon cheeseburger filling, then topped with gooey melted cheese, pickles, and your favorite burger toppings. Whether it’s game day, movie night, or a fun weekend dinner, these cones deliver big flavor and big smiles every time.
Table of Contents
Prep Time: 25 min | Cook Time: 25–30 min | Total: 50–55 min
Yield: 6–8 cones | Difficulty: Medium
Quick Stats Box:
- Cuisine: American / Party Food
- Course: Main Dish / Appetizer
- Diet: Not low-carb, kid-friendly
- Best for: Game day, parties, movie nights, fun family dinners
Why This Recipe Works (4–5 Bullets)
- Show-stopping presentation — Tater tot cones look impressive but are built from simple, familiar ingredients.
- Two textures in one bite — Crispy potato shell with juicy, cheesy bacon-beef filling inside.
- Customizable toppings — Add pickles, lettuce, tomatoes, and sauces just like your favorite burger.
- Prep-ahead friendly — Cones and filling can be made in advance and assembled before serving.
- Kid and crowd approved — Familiar flavors in a fun, handheld form everyone loves.
Ingredient Spotlight
Tater Tots: The Crispy Shell
Frozen tater tots are the shortcut hero here. Once thawed slightly and pressed together, they bake up into a cohesive, crunchy “cone” shell that’s sturdy enough to hold the filling. Using a mold (like a metal cone, foil cone, or wrapped parchment) helps them keep their shape.
Bacon & Beef: Cheeseburger Core
Ground beef and bacon bring classic cheeseburger flavor. Cooking the bacon first and then browning the beef in some of that rendered fat builds layers of savoriness. A little onion, garlic, and burger-style seasoning (mustard, ketchup, Worcestershire) makes the filling taste like a loaded bacon cheeseburger.
Cheese: The Gooey Bridge
Sharp cheddar melts into the beef mixture and also goes on top of the filled cones. Cheddar gives classic burger flavor and color, while a little American or Colby Jack can make the filling extra creamy.
Ingredients
For the Tater Tot Cones:
- 1–1½ bags frozen tater tots (about 32–40 oz total, depending on cone size)
- Cooking spray or a little neutral oil (for greasing molds)
- Salt and black pepper, to taste
For the Bacon Cheeseburger Filling:
- 6–8 slices bacon, chopped
- 1 lb ground beef (80/20 works best)
- 1 small onion, finely diced
- 2 cloves garlic, minced
- 2 tablespoons ketchup
- 1 tablespoon yellow mustard
- 1 tablespoon Worcestershire sauce
- ½ teaspoon smoked paprika (optional)
- ½ teaspoon garlic powder
- ½ teaspoon onion powder
- Salt and black pepper, to taste
For the Cheese & Toppings:
- 1½–2 cups shredded cheddar cheese (divided)
- Dill pickle chips or diced pickles
- Shredded lettuce
- Diced tomatoes
- Sliced green onions (optional)
- Extra ketchup, mustard, or burger sauce for drizzling
Ingredient Notes:
- Quality matters most: Use good, crispy tater tots (not generic mushy ones) so the cones hold together well.
- Room temperature is key: Let tots sit at room temperature 10–15 minutes so they’re easier to press into the cone shape.
- Don’t skip: Worcestershire and mustard in the filling—they make it taste like an actual bacon cheeseburger, not just beef with cheese.
Essential Equipment
You’ll Need:
- Baking sheet
- Parchment paper or silicone baking mat
- Cone molds (metal cream horn molds, metal ice cream cone molds, or DIY foil cones)
- Large skillet
- Mixing spoon or spatula
- Tongs
Nice to Have:
- Cooling rack (to help cones stay crisp)
- Piping bag or spoon with narrow tip (for filling cones cleanly)
How to Make Bacon Cheeseburger Stuffed Tater Tot Cones (Step-by-Step)
Step 1: Prepare the Tater Tot “Dough”
Preheat your oven to 400°F (200°C). Line a baking sheet with parchment paper. Spread the tater tots on the tray and let them thaw slightly at room temperature for about 10–15 minutes until they’re just soft enough to press but still cold. Lightly season with salt and pepper. Using your hands, gently press small clusters of tots together so they start sticking to one another when squeezed.
Pro tip: You want them pliable but not mushy—if they fully thaw, they’ll be harder to shape cleanly.
Step 2: Shape the Cones
Lightly grease your cone molds (or foil cones) with cooking spray. Working with one cone at a time, press tater tots around the mold in a single, snug layer, overlapping slightly so there are no gaps. Cover from the base up toward the tip, leaving the very tip slightly thinner so it bakes through. Press firmly so the tots stick together and to the mold. Place each tot-covered cone seam-side down on the lined baking sheet.
Pro tip: If you don’t have cones, you can form “boats” by lining tots inside greased muffin tins and using the same filling.
Step 3: Bake the Tater Tot Cones
Bake the cones at 400°F for about 20–25 minutes, or until the tater tots are deeply golden and crisp on the outside. Rotate the tray halfway through baking for even browning. If the top half of the cones isn’t browning as much, you can turn them gently on their sides for the last 5–10 minutes. Remove from the oven and let them cool just enough to handle. Carefully slide the molds out and return the empty cones to the baking sheet to keep warm while you prepare the filling.
Pro tip: If any weak spots crack, you can patch them with an extra hot tot pressed in place while still warm.
Step 4: Cook the Bacon and Beef
While the cones bake, cook the filling. In a large skillet over medium heat, cook the chopped bacon until crispy. Transfer bacon to a paper-towel-lined plate, leaving a tablespoon or so of bacon fat in the pan. Add the ground beef and diced onion to the skillet. Cook over medium-high heat, breaking the beef into small crumbles, until the meat is browned and the onion is soft. Drain excess grease if needed, leaving just enough to keep things moist.
Step 5: Season the Bacon Cheeseburger Filling
To the browned beef and onion, add the minced garlic and cook for 30 seconds until fragrant. Stir in ketchup, mustard, Worcestershire sauce, smoked paprika (if using), garlic powder, onion powder, salt, and pepper. Cook for another 2–3 minutes, stirring so the beef is well coated and the mixture thickens slightly. Turn off the heat and stir in about half of the shredded cheddar cheese and most of the crispy bacon (reserve some for topping). The heat of the beef will melt the cheese, creating a thick, scoopable bacon cheeseburger mixture.
Pro tip: The filling should be thick enough to spoon without running—if it seems greasy, blot with a paper towel; if dry, add a spoonful of ketchup or a splash of water.
Step 6: Fill and Top the Cones
Carefully stand the tater tot cones upright in a heat-safe container or on the baking sheet, leaning them against each other if needed. Spoon or pipe the hot bacon cheeseburger mixture into each cone, pressing gently so it fills all the way down. Heap it slightly over the top. Sprinkle the remaining shredded cheddar cheese and reserved bacon over each cone. Return the tray to the oven for 3–5 minutes, just until the cheese on top melts and bubbles.
Step 7: Garnish and Serve
Remove the cones from the oven and let them sit 2–3 minutes so they’re easier to handle but still hot. Top each cone with a few dill pickle chips or diced pickles, shredded lettuce, diced tomatoes, or green onions as desired. Drizzle with extra ketchup, mustard, or your favorite burger sauce. Serve immediately while the tater tot cones are crisp and the filling is hot and cheesy.
Note: “Process photos appear between each step for visual guidance.”
Expert Tips & Tricks
- Temperature Matters: Bake cones hot (around 400°F) so the tots get truly crisp and set into shape.
- Don’t Rush the Shape: Spend an extra minute pressing tots firmly onto the mold—this prevents cracking and gaps.
- The Secret to Flavor: Season the beef like a burger: ketchup, mustard, Worcestershire, and a bit of onion and garlic powder.
- Common Mistake: Overfilling the cones with loose, greasy meat. Keep the filling thick and cohesive so it doesn’t leak out.
- Fun Discovery: Adding a few diced pickles directly into the meat mixture gives surprise tangy pops in every bite.
Customization Ideas
Dietary Modifications:
- Gluten-Free: Choose gluten-free tater tots and make sure condiments are gluten-free.
- Lower Fat: Use lean ground beef or turkey, center-cut bacon, and reduced-fat cheese.
- Spicier Version: Use pepper jack cheese and add jalapeños or hot sauce to the filling.
Flavor Variations:
- BBQ Bacon Cheeseburger Cones: Swap some ketchup for BBQ sauce and add a little smoked paprika.
- Mushroom Swiss Cones: Add sautéed mushrooms and use Swiss cheese instead of cheddar.
- Western Cones: Add caramelized onions, BBQ sauce, and crispy onion strings on top.
- Breakfast Cones: Use breakfast sausage instead of beef, add scrambled eggs and cheddar.
Serving Styles:
- Party Platter: Arrange cones upright in a lined baking dish or tall glasses and set out a topping bar (pickles, lettuce, sauces).
- Family Dinner: Serve 1–2 cones per person with a side salad or roasted veggies.
- Kids’ Night: Make mini cones using smaller molds or muffin-tin “cups” for smaller hands.

Storage & Meal Prep
Make Ahead:
- Form and bake tater tot cones up to 1 day ahead; cool completely and store covered in the fridge. Recrisp in the oven before filling.
- Cook the bacon cheeseburger filling up to 2 days ahead; reheat gently on the stovetop before stuffing.
Storing:
- Fridge: Store leftover filled cones wrapped or in airtight containers for up to 2 days.
- Freezer: Best to freeze filling only; tater tot cones lose crispness when frozen and thawed.
Reheating for Best Results:
Reheat cones in a 350°F (175°C) oven or air fryer for 8–10 minutes until hot and re-crisped. If using a microwave, expect softer tots—use only for quick single servings.
What to Serve With Bacon Cheeseburger Stuffed Tater Tot Cones
Perfect Pairings:
- Simple green salad with ranch or burger-style dressing.
- Coleslaw (creamy or vinegar-based) for crunch and freshness.
- Veggie sticks with dip to balance the richness.
Complete the Meal:
- Serve cones with a big salad and roasted veggies for a fun but balanced dinner.
- Add chips and pickles for full-on game day vibes.
- Pair with milkshakes or floats for a retro burger-joint experience.
Nutrition Facts (Per Cone – Approximate)
Calories: ~420 | Protein: ~19g | Carbs: ~32g | Fat: ~24g | Fiber: ~3g | Sugar: ~4g | Sodium: ~780mg
Note: Values vary based on tater tot brand, beef fat percentage, cheese type, and cone size.
Your Questions Answered
Can I make these without cone molds?
Yes. You can press tots into greased muffin tins or ramekins to make “cups” and fill them the same way.
How do I keep the cones from falling apart?
Use slightly thawed tots, press them firmly into a single layer, and bake until very crisp. Let them cool a bit before removing the mold.
Can I air fry the cones instead of baking?
You can, as long as they fit in your air fryer basket. Cook at around 375–400°F, watching carefully to prevent burning.
Can I make them ahead for a party?
Bake cones and make the filling ahead. Just reheat cones to crisp them up, warm the filling, then stuff, top with cheese, and quickly melt in the oven before serving.
What’s the best cheese to use?
Sharp cheddar is classic, but you can mix cheddar with American for extra creaminess or use pepper jack for heat.
Recipe History & Cultural Context
Stuffed tater tot cones are a playful twist on two American obsessions: loaded burgers and crispy potato snacks. As mash-up foods and over-the-top “fair style” dishes exploded on social media, creative cooks began shaping familiar ingredients—like tater tots—into cones, bowls, and cups to hold all sorts of fillings. At the same time, bacon cheeseburger casseroles, dips, and sliders were gaining popularity as crowd-pleasing game-day food.
Combining tater tots and cheeseburgers into one handheld cone taps into this trend of taking nostalgic comfort foods and presenting them in new, Instagram-ready formats. It’s fun, a bit over the top, and unapologetically indulgent—exactly the kind of thing people love to serve for parties and special occasions. While there’s no single origin story, dishes like this reflect how home cooks and food bloggers continuously remix classic flavors into creative new forms that are as fun to look at as they are to eat.
Printable Recipe Card
Bacon Cheeseburger Stuffed Tater Tot Cones
Crispy tater tot cones stuffed with cheesy bacon cheeseburger filling—perfect for parties and game day!
Ingredients:
- 1–1½ bags frozen tater tots
- Cooking spray
- 6–8 slices bacon, chopped
- 1 lb ground beef
- 1 small onion, diced
- 2 cloves garlic, minced
- 2 tbsp ketchup
- 1 tbsp yellow mustard
- 1 tbsp Worcestershire sauce
- ½ tsp smoked paprika (optional)
- ½ tsp garlic powder
- ½ tsp onion powder
- Salt and pepper, to taste
- 1½–2 cups shredded cheddar cheese
- Optional toppings: pickles, lettuce, tomatoes, green onions, sauces
Instructions:
- Preheat oven to 400°F (200°C). Let tater tots thaw slightly.
- Grease cone molds. Press tots around each mold in a single tight layer. Place on lined baking sheet.
- Bake 20–25 minutes until cones are deeply golden and crisp. Carefully remove molds; keep cones warm.
- Cook bacon in skillet until crispy. Remove; drain most fat.
- Brown beef and onion in same skillet. Add garlic, ketchup, mustard, Worcestershire, spices, salt, and pepper. Cook 2–3 minutes.
- Stir in about half the cheese and most of the bacon.
- Fill cones with hot bacon cheeseburger mixture. Top with remaining cheese and bacon. Bake 3–5 minutes to melt cheese.
- Garnish with pickles, lettuce, tomatoes, and sauces. Serve hot.
Notes:
- Press tots firmly on molds so cones hold together.
- Filling should be thick, not runny.
- Cones and filling can be made ahead and assembled just before serving.