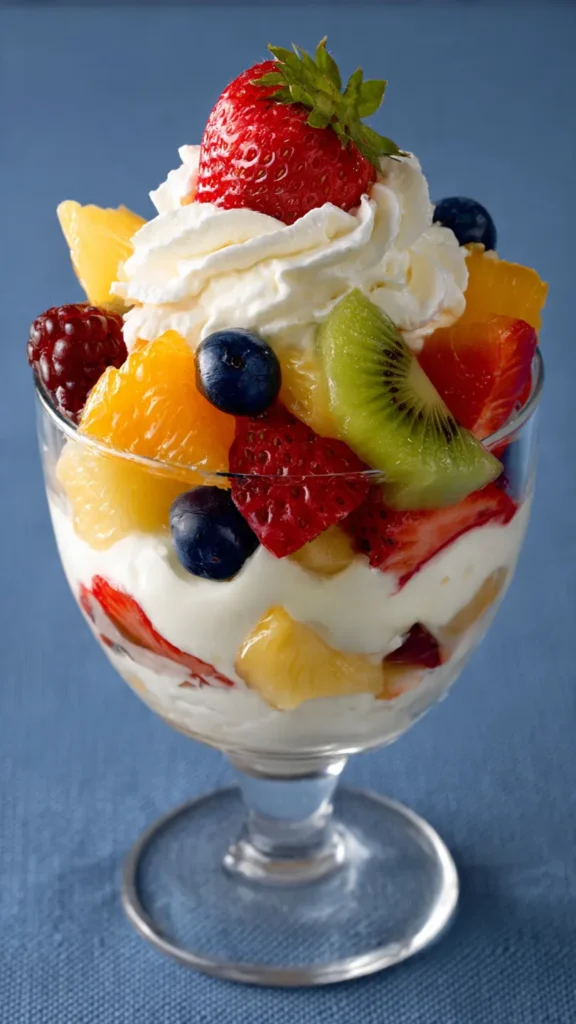
Cheesecake Fruit Salad Cream
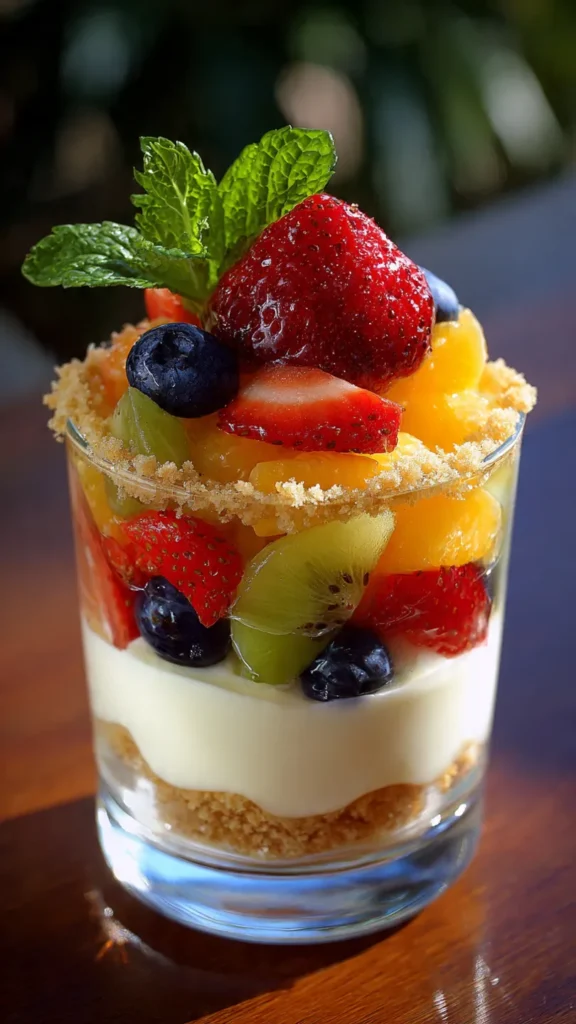
Cheesecake Fruit Salad Cream is a delightful dessert-meets-side dish that combines fresh, juicy fruit with a creamy, sweet cheesecake-flavored dressing. This crowd-pleasing recipe features colorful berries, grapes, and tropical fruit coated in a luscious mixture of cream cheese, yogurt, whipped topping, and cheesecake pudding mix that tastes just like the filling from a no-bake cheesecake. It’s light, refreshing, and absolutely irresistible—perfect for summer gatherings, potlucks, holidays, or anytime you want a fruity treat with a decadent twist.
What makes this recipe so appealing is how incredibly easy it is to prepare with no baking required, ready in just 10-15 minutes. The creamy cheesecake dressing is sweet with a subtle tang from the cream cheese and yogurt, creating the perfect complement to fresh seasonal fruit. Whether you serve it as a refreshing side dish at BBQs, a light dessert after dinner, or a sweet breakfast treat, this versatile salad delivers bakery-quality flavor with minimal effort. Kids and adults alike love the sweet, creamy coating on every piece of fruit, making it disappear fast at any gathering.
Table of Contents
Recipe Quick Facts
Prep Time: 10 minutes
Cook Time: 0 minutes (no bake)
Total Time: 10 minutes (plus optional 30 minutes chilling)
Servings: 10 servings
Difficulty Level: Easy
Cuisine Type: American
Course: Dessert, Side Dish
Dietary Labels: Vegetarian, Gluten-Free
Why You’ll Love This Recipe
- No-bake simplicity – Comes together in just 10 minutes with no oven required, perfect for hot summer days
- Tastes like cheesecake – The creamy filling has all the flavors of classic cheesecake without any of the work
- Versatile and customizable – Use any fresh or seasonal fruit you love or have on hand
- Perfect for crowds – Ideal for potlucks, BBQs, holidays, and family gatherings
- Doubles as dessert or side – Sweet enough for dessert but light enough to serve as a fruit side dish
Ingredients
For the Cheesecake Cream
- 8 ounces cream cheese, softened to room temperature
- ¼ cup granulated sugar
- 1 (3.4-ounce) package instant cheesecake pudding mix, dry
- 4-6 ounces strawberry yogurt (or vanilla yogurt)
- 8 ounces frozen whipped topping, thawed (Cool Whip or homemade)
For the Fruit Salad
- 1 pound fresh strawberries, hulled and quartered
- 1 pint fresh blueberries
- 6 ounces fresh raspberries
- 1 cup red or green grapes, halved
- 1 banana, sliced (optional)
- 1 peach or nectarine, diced (optional)
- 1 cup pineapple chunks (optional)
Optional Toppings
Ingredient Note: Make sure cream cheese is fully softened to room temperature for smooth blending. Use ripe, fresh fruit for the best flavor.
Equipment Needed
- Large mixing bowl
- Medium mixing bowl
- Electric hand mixer or stand mixer with whip attachment
- Spatula or wooden spoon
- Measuring cups and spoons
- Knife and cutting board
- Serving bowl or trifle dish
Step-by-Step Instructions
- Prepare the fruit: Wash all fresh berries and pat dry thoroughly. Hull and quarter the strawberries, halve the grapes if using, and slice the banana if adding. Place all prepared fruit in a large bowl and set aside.
- Soften cream cheese: Ensure your cream cheese is at room temperature. This is crucial for achieving a smooth, lump-free dressing.
- Beat cream cheese and sugar: In a medium mixing bowl, use an electric hand mixer to beat the softened cream cheese and sugar together on medium-high speed for 2-3 minutes until light, fluffy, and creamy.
- Add pudding mix and yogurt: Sprinkle the dry cheesecake pudding mix directly over the cream cheese mixture. Add the strawberry yogurt. Beat on medium speed until completely smooth and well combined, about 1-2 minutes.
- Fold in whipped topping: Add the thawed whipped topping to the cream cheese mixture. Using a spatula, gently fold it in using a circular motion until everything is well blended and the mixture is fluffy and smooth. Don’t overmix or you’ll deflate the whipped cream.
- Combine with fruit: Pour the creamy cheesecake mixture over the prepared fruit in the large bowl. Using a large spatula or spoon, gently fold everything together until all the fruit is evenly coated with the creamy dressing. Be careful not to smash or bruise the berries.
- Optional chilling: For best flavor and texture, cover the bowl and refrigerate for at least 30 minutes to allow flavors to meld. However, you can serve immediately if desired.
- Garnish and serve: Just before serving, sprinkle crushed graham crackers on top for added cheesecake flavor and crunch if desired. Transfer to a pretty serving bowl and serve cold.
Pro Tips for Success
- Room temperature cream cheese is essential – Cold cream cheese will create lumps; let it sit out for 30-60 minutes before starting
- Dry fruit thoroughly – Excess water on fruit will make the salad watery and dilute the creamy dressing
- Don’t overmix – Gently fold the whipped topping and fruit to maintain a light, fluffy texture
- Add bananas last – If using bananas, toss them with a little lemon juice first to prevent browning
- Customize the fruit – Use whatever is in season or on sale for the best flavor and value
- Make ahead components – Prepare the cream mixture and cut the fruit separately, then combine just before serving to prevent sogginess
- Serve cold – This salad tastes best when well chilled
Substitutions & Variations
- Yogurt flavors: Use vanilla, mixed berry, peach, or plain Greek yogurt instead of strawberry
- Tropical version: Make Hawaiian Cheesecake Salad with pineapple, mango, kiwi, mandarin oranges, and banana
- Berry blend: Use only mixed berries (strawberries, blueberries, raspberries, blackberries) for a berry cheesecake salad
- Homemade whipped cream: Replace Cool Whip with homemade whipped cream made from 1 cup heavy cream, ½ cup powdered sugar, and ½ teaspoon vanilla
- Sugar-free option: Use sugar-free pudding mix and reduce or eliminate added sugar
- Add marshmallows: Fold in 2-3 cups mini marshmallows for extra sweetness and texture
- Cream alternative: Use French vanilla coffee creamer instead of yogurt for a different flavor
- Fall version: Use apples, pears, grapes, and pomegranate seeds for autumn gatherings
- Lighter version: Use low-fat or fat-free cream cheese, yogurt, and whipped topping
Storage & Make-Ahead Tips
- Room Temperature: Should not sit out longer than 2 hours; keep refrigerated
- Refrigerate: Store covered in an airtight container for 1-2 days. Best enjoyed fresh as fruit releases liquid over time
- Freeze: Not recommended as fruit and cream cheese mixture don’t freeze well
- Make Ahead Cream: Prepare the cheesecake cream mixture up to 24 hours ahead and refrigerate separately
- Prep Fruit Ahead: Cut and prepare fruit up to 4 hours ahead, store separately, then combine with cream just before serving
- Drain excess liquid: If salad sits overnight, drain any accumulated fruit juice before serving to maintain creamy texture
Serving Suggestions
- Serve in a clear trifle bowl or glass serving dish to show off the colorful fruit layers
- Perfect for summer BBQs, picnics, Memorial Day, 4th of July, and Labor Day gatherings
- Ideal for brunch buffets, baby showers, bridal showers, or Easter dinner
- Serve as a light dessert after grilled meats like ribs, chicken, or burgers
- Great for potlucks and church gatherings—always a crowd favorite
- Pair with other summer sides like pasta salad, coleslaw, or baked beans
- Serve in individual parfait glasses for elegant single-serve presentations
Nutrition Information (Per Serving – based on 10 servings)
Calories: 185 | Protein: 3g | Carbohydrates: 28g | Fat: 8g | Fiber: 2g | Sugar: 23g | Sodium: 150mg
FAQ
1. Can I make cheesecake fruit salad ahead of time?
You can prepare the cheesecake cream and cut the fruit separately up to 24 hours ahead, storing them in separate containers. Combine them 1-2 hours before serving for best results. Fully assembled salad keeps for 1-2 days but is best fresh.
2. What fruits work best in cheesecake fruit salad?
Berries (strawberries, blueberries, raspberries), grapes, and bananas are most popular. You can also use peaches, pineapple, kiwi, mandarin oranges, apples, or mango. Use firm, ripe fruit that won’t get mushy.
3. Can I use fresh whipped cream instead of Cool Whip?
Yes! Whip 1 cup heavy cream with ½ cup powdered sugar and ½ teaspoon vanilla until stiff peaks form, then fold into the mixture.
4. Why is my cheesecake cream lumpy?
The cream cheese wasn’t soft enough. Always bring cream cheese to room temperature before mixing. If lumpy, beat longer with the mixer until completely smooth.
5. How long does cheesecake fruit salad last?
It’s best enjoyed within 1-2 days of making. Over time, the fruit releases liquid which can make the salad watery and the cream less fluffy.
6. Can I use canned fruit instead of fresh?
Yes, but drain canned fruit very thoroughly and pat dry with paper towels to remove excess liquid. Fresh fruit generally provides better texture and flavor.
Recipe Notes
Cheesecake Fruit Salad has become a beloved potluck and BBQ staple across America, particularly in the Midwest and Southern states where creamy fruit salads are a traditional side dish. This modern version elevates the classic concept by incorporating instant cheesecake pudding mix, which adds authentic cheesecake flavor without the complexity of making actual cheesecake. The beauty of this recipe lies in its versatility—it works equally well as a light dessert after a heavy meal or as a sweet side dish alongside savory BBQ and grilled foods. The combination of cream cheese, yogurt, and whipped topping creates a stable cream that coats fruit beautifully and doesn’t weep or separate like some fruit salad dressings. Many home cooks personalize this recipe based on seasonal availability and regional preferences: tropical versions with pineapple and mango are popular in warmer climates, while berry-heavy versions dominate in the Pacific Northwest and Northeast. The optional graham cracker topping is a clever touch that reinforces the cheesecake theme and adds a delightful textural contrast to the soft fruit and creamy dressing. This recipe has gained massive popularity on social media for its photogenic appearance and simple preparation, making it a go-to recipe for hosts who want impressive results without spending hours in the kitchen.