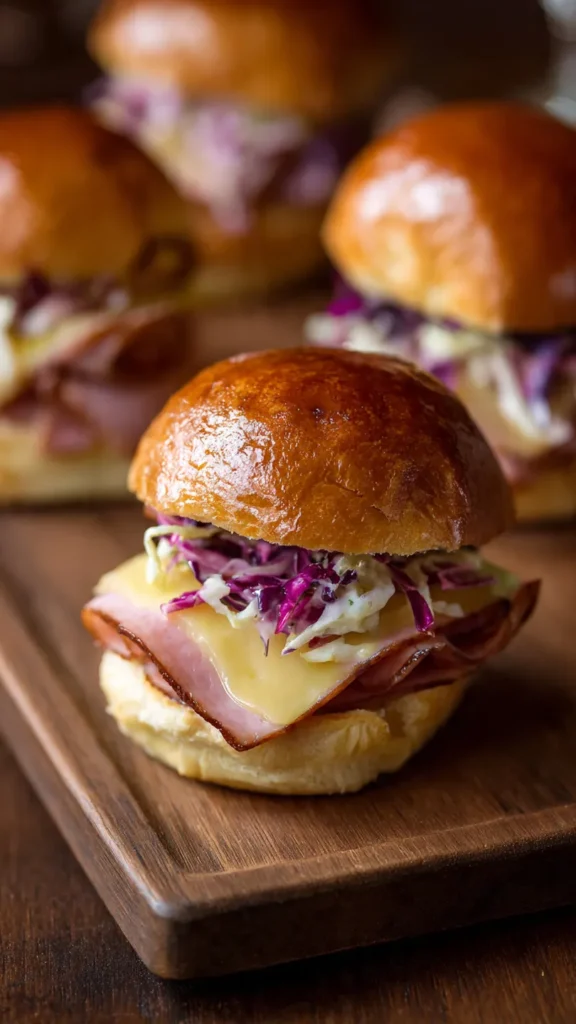
Glazed Ham and Cheese Sliders (Buttery, Sweet & Party Perfect!)

There’s something absolutely irresistible about biting into a warm, buttery slider with layers of savory ham, melted Swiss cheese, and that sweet, tangy glaze that soaks into every bite. These Glazed Ham and Cheese Sliders have become a party legend for good reason—they’re incredibly easy to make, feed a crowd effortlessly, and disappear faster than anything else on the buffet table. The magic happens when Hawaiian sweet rolls meet a luscious brown sugar butter glaze that creates golden, crispy tops while keeping the insides soft and steamy.
What makes this recipe truly brilliant is that you bake an entire tray of connected rolls all at once, eliminating the tedious work of assembling individual sandwiches. The combination of sweet Hawaiian rolls with savory ham, the tang of Dijon mustard, and that addictive butter glaze creates flavor harmony that everyone loves—from kids to grandparents. Whether you’re hosting a game day party, need an easy potluck contribution, or want a quick weeknight dinner, you’ll get sliders that taste like you spent hours in the kitchen when they actually took just 30 minutes from start to finish.
Table of Contents
Prep Time: 10 min | Cook Time: 20 min | Total: 30 min
Yield: 12 sliders | Difficulty: Easy
Quick Stats Box:
- Cuisine: American
- Course: Appetizer, main dish
- Diet: Can be customized
- Best for: Parties, game day, potlucks, quick dinners
Why This Recipe Works
- Incredibly easy assembly — Layer everything in one pan and bake—no individual sandwich making required
- Sweet and savory perfection — Hawaiian rolls and brown sugar glaze balance the savory ham and cheese beautifully
- Buttery glaze magic — The honey Dijon butter mixture gets brushed on top, creating irresistible golden, crispy edges
- Feeds a crowd effortlessly — One pan makes a dozen sliders, perfect for parties and gatherings
- Make-ahead friendly — Assemble hours ahead and bake when guests arrive for hot, fresh sliders
Ingredient Spotlight
Hawaiian Sweet Rolls are Essential: King’s Hawaiian rolls are the gold standard for sliders because their slight sweetness and soft, pillowy texture complement savory fillings perfectly. They stay soft even after baking while developing golden, buttery tops.
Quality Deli Ham Matters: Use good quality deli ham sliced medium-thick—not too thin or it disappears, not too thick or the sliders become hard to bite. Honey ham, smoked ham, or Black Forest ham all work beautifully.
Swiss Cheese is Traditional: Swiss cheese melts smoothly and has mild, nutty flavor that doesn’t overpower the ham. It’s the classic choice, though provolone, Monterey Jack, or cheddar also work well.
Brown Sugar Butter Glaze: The combination of melted butter, brown sugar, Dijon mustard, Worcestershire sauce, and poppy seeds creates a sweet-savory glaze that soaks into the rolls and caramelizes on top. This glaze is what transforms simple sliders into something crave-worthy.
Ingredients
For the Sliders:
- 1 package (12 count) Hawaiian sweet dinner rolls
- ¾ to 1 lb deli ham, thinly sliced
- 12 slices Swiss cheese (or 8-10 oz sliced)
- Optional: 2 tablespoons Dijon mustard (for spreading on rolls)
For the Butter Glaze:
- ½ cup (1 stick) unsalted butter, melted
- ⅓ cup brown sugar, packed
- 2 tablespoons Dijon mustard
- 1 tablespoon Worcestershire sauce
- 1 tablespoon poppy seeds (optional but traditional)
- 1 teaspoon onion powder
- ½ teaspoon garlic powder
Optional Add-Ins:
- 3 tablespoons honey (for extra sweetness)
- ¼ cup raspberry or apricot preserves (to serve on the side)
- Fresh ground black pepper
Ingredient Notes:
- Quality matters most: Use real butter and good quality deli ham for best flavor
- Room temperature is key: Let butter cool slightly after melting before adding other glaze ingredients
- Don’t skip: The butter glaze is what makes these special—don’t use plain butter
Essential Equipment
You’ll Need:
- 9×13-inch baking dish — greased or lined with parchment
- Serrated knife — for slicing rolls horizontally
- Small bowl — for mixing butter glaze
- Pastry brush or spoon — for applying glaze
- Aluminum foil — for covering during baking
Nice to Have:
- Parchment paper — prevents sticking and makes cleanup easier
- Whisk — for mixing glaze smoothly
How to Make Glazed Ham and Cheese Sliders (Step-by-Step)
Step 1: Prep the Pan and Rolls
Preheat your oven to 350°F (175°C). Spray a 9×13-inch baking dish with nonstick cooking spray or line with parchment paper for easy cleanup. Without separating the rolls, use a sharp serrated knife to carefully slice the entire sheet of Hawaiian rolls horizontally through the middle, creating one complete top half and one complete bottom half. This is much easier than separating and slicing individual rolls. Place the bottom half of the rolls in the prepared baking dish, cut side up.
Pro tip: Keeping rolls connected makes assembly much faster and ensures even distribution of ingredients.
Step 2: Optional – Add Dijon Mustard
If you like a tangy kick, spread a thin layer of Dijon mustard evenly over the bottom rolls. This step is optional but adds a nice contrast to the sweet glaze. Don’t use too much—just a light coating is perfect. You can also skip this step if you prefer a sweeter slider.
Common mistake: Using too much mustard makes the sliders too tangy—a little goes a long way.
Step 3: Layer Ham and Cheese
Layer the Swiss cheese slices evenly over the bottom rolls, covering the entire surface. You’ll use about 6 slices for the bottom layer. Next, layer all the deli ham over the cheese, folding slices to create even coverage across all 12 slider sections. Don’t pile it too high—you want balanced ham-to-roll ratio. Top with the remaining Swiss cheese slices, again covering all the ham. Place the top half of the rolls over the cheese, completing your sandwich.
Test kitchen discovery: Layering cheese on both bottom and top creates maximum meltiness throughout.
Step 4: Make the Butter Glaze
In a small bowl, combine melted butter with brown sugar, Dijon mustard, Worcestershire sauce, poppy seeds (if using), onion powder, and garlic powder. Whisk or stir until the brown sugar is mostly dissolved and everything is well combined. The mixture should be slightly thick and glossy. If it seems too thick, warm it slightly; if too thin, add a bit more brown sugar.
Pro tip: Let melted butter cool for 2-3 minutes before adding other ingredients to prevent separation.
Step 5: Brush on the Glaze
Use a pastry brush or spoon to generously brush the entire butter glaze mixture over the top of the rolls. Make sure to coat every inch of the surface, getting into all the crevices between the rolls. The glaze should pool slightly around the edges—this is perfect. Use all of the glaze for maximum flavor and that signature golden crust.
Common mistake: Being stingy with the glaze—use it all for the best flavor and texture.
Step 6: Cover and Bake
Cover the baking dish tightly with aluminum foil. This is crucial—it traps steam that melts the cheese and keeps the rolls soft inside. Bake covered for 15-20 minutes until the cheese is completely melted and the sliders are heated through. Remove the foil and bake for an additional 3-5 minutes until the tops are golden brown and slightly crispy. Watch carefully during the uncovered phase to prevent burning—you want golden, not dark brown.
Pro tip: The foil cover ensures perfectly melted cheese every time without drying out the tops.
Step 7: Cool Slightly and Serve
Remove from the oven and let the sliders rest for 2-3 minutes before cutting. This allows the cheese to set slightly so they hold together when cut. Use a sharp knife to cut along the natural divisions in the rolls, creating 12 individual sliders. Serve warm. These are best enjoyed fresh from the oven when the butter glaze is still slightly tacky and the cheese is perfectly melted.
Pro tip: Serve with raspberry or apricot preserves on the side for dipping—the sweet-tart jam is an amazing complement.
Expert Tips & Tricks
Temperature Matters: Make sure your oven is fully preheated to 350°F for even cooking and proper glaze caramelization. Too hot and the tops burn before the cheese melts; too cool and everything takes too long.
Don’t Overbake: The sliders are done when the cheese is melted and tops are golden—usually 20-25 minutes total. Overbaking dries them out and makes rolls tough.
The Secret to Extra Flavor: Let the assembled sliders (before glazing) sit in the refrigerator for 30 minutes to overnight. This allows flavors to meld and makes the rolls even softer when baked.
Common Mistake: Separating the rolls before slicing—keeping them connected makes assembly infinitely easier and ensures even layering.
Make-Ahead Magic: Assemble completely, cover with foil (don’t bake), and refrigerate up to 24 hours. When ready to serve, let sit at room temperature 15 minutes, then bake as directed, adding 5 minutes to covered baking time.
Customization Ideas
Dietary Modifications:
- Gluten-Free: Use gluten-free slider rolls—texture won’t be quite as soft but still delicious
- Lower Sodium: Use low-sodium ham and reduce or omit Worcestershire sauce
- Lighter Version: Use reduced-fat cheese and half the butter (though they won’t be quite as indulgent)
Flavor Variations:
- Turkey and Swiss: Replace ham with turkey for a lighter option
- Cuban Style: Use roasted pork, Swiss cheese, pickles, and Cuban mojo glaze
- Italian Sliders: Use salami and pepperoni with mozzarella, add Italian seasoning to glaze
- BBQ Ham Sliders: Mix BBQ sauce into the butter glaze for smoky-sweet flavor
- Jalapeño Popper: Add sliced jalapeños and use pepper jack cheese for heat
Serving Styles:
- Game Day Appetizer: Cut into smaller portions for bite-sized party food
- Dinner Main: Serve 2-3 sliders per person with soup or salad
- Brunch Option: Perfect for holiday brunches or breakfast gatherings
- Picnic Food: Wrap individually in foil to keep warm for outdoor eating
Storage & Meal Prep
Make Ahead:
- Fully assembled (unbaked): Assemble completely up to 24 hours ahead, cover tightly, refrigerate, and bake when ready
- Glaze only: Mix butter glaze up to 3 days ahead and refrigerate; reheat before using
- Baked sliders: Bake completely, cool, wrap tightly, and refrigerate up to 3 days
Storing:
- Counter: Baked sliders should not sit at room temperature more than 2 hours
- Fridge: Store covered or in airtight container for up to 3-4 days
- Freezer: Wrap assembled unbaked sliders tightly in plastic wrap then foil, freeze up to 2 months; bake from frozen adding 10 minutes
Reheating for Best Results:
From refrigerator: Cover with foil and reheat at 350°F for 10-15 minutes until warmed through. Remove foil for last 2-3 minutes to re-crisp tops.
From frozen: Bake frozen sliders covered at 350°F for 25-30 minutes, then uncovered 5 minutes until golden.
Microwave method (not ideal): Heat individual sliders 20-30 seconds, but tops won’t be crispy.
Pro tip: These actually reheat beautifully, making them perfect for meal prep or leftovers.
What to Serve With Glazed Ham and Cheese Sliders
Perfect Pairings:
- Potato Chips: Classic party pairing—keep it simple with your favorite chips
- Pasta Salad or Potato Salad: Creamy salads complement the savory sliders
- Pickle Spears: Tangy pickles cut through the richness perfectly
- Fresh Fruit: Grapes, strawberries, or melon provide refreshing contrast
Complete the Meal:
- Appetizers: Serve with vegetable tray, cheese board, or dips
- Side Dishes: Coleslaw, baked beans, mac and cheese, or green salad
- Beverages: Lemonade, iced tea, soda, or beer
- Dessert: Keep it simple with brownies, cookies, or fruit tart
Nutrition Facts (Per Slider – Based on 12 servings)
Calories: 295 | Protein: 14g | Carbs: 26g | Fat: 15g | Fiber: 1g | Sugar: 12g | Sodium: 580mg
Note: Calculated using standard ingredients. Values will vary based on specific brands and portion sizes used.

Your Questions Answered
Can I use regular dinner rolls instead of Hawaiian rolls?
Yes, but you’ll miss the signature sweet flavor that makes these special. Hawaiian rolls are highly recommended for authentic taste and texture.
Do I have to use Swiss cheese?
No! Provolone, cheddar, Monterey Jack, or pepper jack all work beautifully. Swiss is traditional and melts wonderfully, but use your favorite.
Can these be made ahead?
Absolutely! Assemble completely, cover, and refrigerate up to 24 hours before baking. They’re perfect make-ahead party food.
Why do I need to cover them with foil?
The foil traps steam that melts the cheese perfectly and keeps rolls soft inside while allowing tops to get golden when uncovered.
Can I freeze these sliders?
Yes! Freeze assembled unbaked sliders wrapped tightly for up to 2 months. Bake from frozen, adding 10 minutes to covered baking time.
What makes the glaze so good?
The combination of butter, brown sugar, Dijon mustard, and Worcestershire creates sweet-savory-tangy perfection that caramelizes on top.
How do I prevent soggy bottoms?
Don’t add too much mustard to the bottom rolls, and make sure your baking time is adequate so the glaze can absorb and caramelize.
Recipe History & Cultural Context
Ham and cheese sliders have become an American party food staple, particularly in the South and Midwest where they’re often called “funeral sandwiches” due to their popularity at church gatherings and memorial services. The recipe’s exact origins are unclear, but it gained widespread popularity in the 1980s and 1990s as Hawaiian rolls became more widely available nationwide.
King’s Hawaiian bread was invented by Robert Taira in Hilo, Hawaii in the 1950s using a Portuguese sweet bread recipe. When the company moved to mainland United States and started mass-producing their signature rolls, creative home cooks discovered that these sweet, soft rolls were perfect for making sliders. The combination of Hawaiian rolls with savory ham and a sweet butter glaze created a flavor profile that appealed to all ages.
The genius of baking an entire connected sheet of rolls transformed slider-making from tedious individual assembly into effortless entertaining. This technique—layering ingredients on connected rolls, adding a flavored butter topping, and baking everything together—has become a template for countless slider variations. Today, glazed ham and cheese sliders are a potluck legend, the kind of dish that gets requested repeatedly and disappears within minutes at every gathering. They represent practical American home cooking at its best: simple ingredients, minimal effort, and maximum crowd-pleasing results.
Printable Recipe Card
Glazed Ham and Cheese Sliders
Hawaiian rolls with ham, Swiss cheese, and sweet brown sugar butter glaze
Ingredients:
Sliders: 12 Hawaiian sweet rolls, ¾-1 lb deli ham (sliced), 12 slices Swiss cheese, 2 tbsp Dijon mustard (optional)
Glaze: ½ cup melted butter, ⅓ cup brown sugar, 2 tbsp Dijon mustard, 1 tbsp Worcestershire sauce, 1 tbsp poppy seeds (optional), 1 tsp onion powder, ½ tsp garlic powder
Instructions:
- Preheat oven to 350°F. Grease 9×13-inch baking dish.
- Without separating, slice entire sheet of Hawaiian rolls horizontally. Place bottom half in baking dish.
- Optional: Spread thin layer of Dijon mustard on bottom rolls.
- Layer half the Swiss cheese on bottom, add all the ham (folded to fit), then top with remaining cheese. Place top rolls over cheese.
- In small bowl, mix melted butter with brown sugar, Dijon, Worcestershire, poppy seeds, onion powder, and garlic powder. Whisk until combined.
- Brush entire butter glaze mixture over top of rolls, coating completely.
- Cover tightly with foil. Bake 15-20 minutes until cheese melts.
- Remove foil, bake 3-5 minutes more until tops are golden brown.
- Let rest 2-3 minutes, then cut into 12 individual sliders. Serve warm.
Notes:
- Keep rolls connected before slicing—much easier!
- Use ALL the glaze for best flavor
- Can assemble 24 hours ahead and bake when ready
- Cover with foil to melt cheese, uncover to crisp tops
- Freezes well unbaked for up to 2 months
- Serve with raspberry preserves for dipping