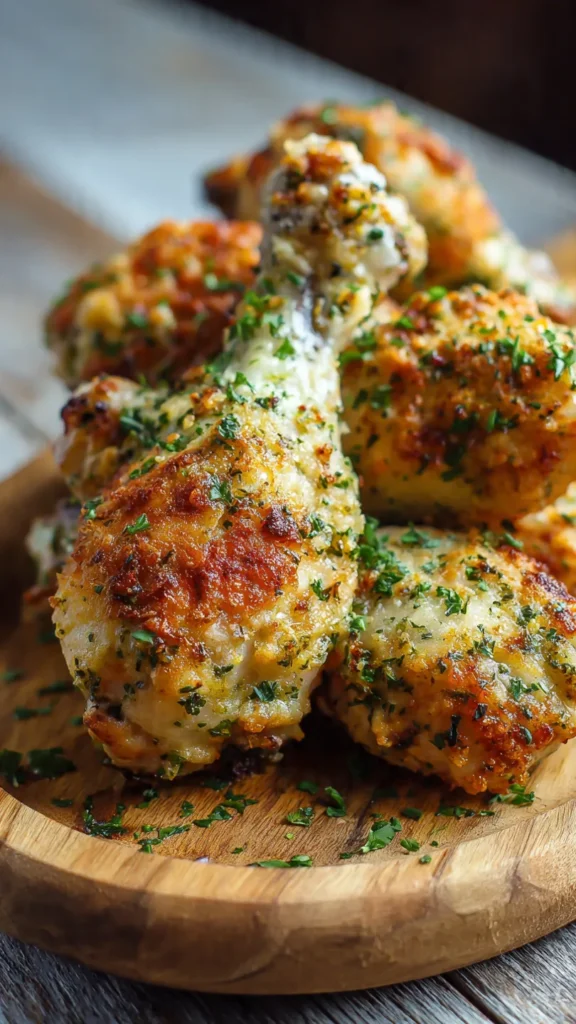
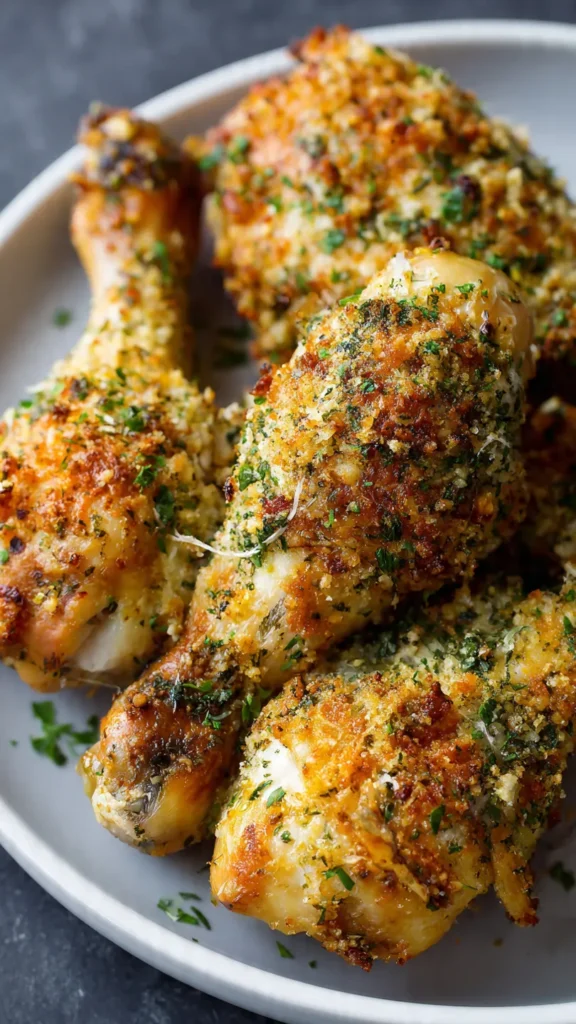
Baked Garlic Parmesan Chicken Drumsticks

There’s something undeniably satisfying about biting into perfectly baked chicken drumsticks with crispy, golden skin and juicy meat that falls off the bone. When you add the irresistible combination of garlic and Parmesan cheese to the mix, you’ve got a dinner that rivals any restaurant favorite. These Baked Garlic Parmesan Chicken Drumsticks deliver bold, buttery flavor without the mess of frying, making them perfect for busy weeknights or weekend gatherings.
What makes this recipe truly special is its simplicity. With just a handful of pantry staples and about 50 minutes from start to finish, you can create restaurant-quality chicken that looks impressive but requires minimal effort. The garlic-herb coating creates a savory crust while the cheese adds a nutty richness that keeps everyone coming back for seconds.
Why You’ll Love This Recipe
Chicken drumsticks are often overlooked in favor of breasts or thighs, but they’re actually one of the most flavorful cuts available. The dark meat stays incredibly moist during baking, and the skin crisps up beautifully when prepared correctly. Unlike breaded recipes that require multiple steps and messy dredging stations, this version uses a simple toss-and-bake method that coats each drumstick evenly without the fuss.
The garlic Parmesan coating does double duty in this recipe. First, it infuses the chicken with bold Italian-inspired flavors that complement the natural richness of the dark meat. Second, the cheese helps create that coveted crispy exterior that makes each bite textured and delicious. The combination of fresh minced garlic and garlic powder provides layers of flavor—the fresh garlic offers pungent sharpness while the powder adds depth throughout.
This recipe is also incredibly versatile. Serve these drumsticks as a main course alongside roasted vegetables and rice, pack them for lunch meal prep, or arrange them on a platter for game day snacking. They’re equally delicious hot from the oven or at room temperature, making them ideal for picnics and potlucks.
Ingredients You’ll Need
Prep time: 10 minutes
Cook time: 40 minutes
Total time: 50 minutes
Yield: 6 servings
Main Ingredients
- 10–12 chicken drumsticks
- 3 tablespoons olive oil or melted butter
- 4 cloves garlic, minced
- 1/2 cup grated Parmesan cheese
- 1 teaspoon garlic powder
- 1 teaspoon Italian seasoning
- 1/2 teaspoon paprika
- Salt and black pepper, to taste
- 2 tablespoons fresh parsley, finely chopped
Ingredient Notes
Choose drumsticks that are similar in size so they cook evenly. If you’re buying them from a butcher counter, ask for medium-sized pieces that weigh about 3–4 ounces each.
For the fat component, both olive oil and melted butter work beautifully. Olive oil creates a lighter coating and allows the garlic flavor to shine through, while butter adds extra richness and helps the Parmesan adhere better. You can even use a combination of both for the best of both worlds.
Freshly grated Parmesan cheese makes a significant difference in this recipe. Pre-shredded varieties often contain anti-caking agents that prevent smooth melting and can create a grainy texture. If you have access to a block of authentic Parmigiano-Reggiano, it’s worth the investment for its nutty, complex flavor.
Fresh garlic provides the most vibrant taste, but if you’re in a pinch, you can substitute 1 teaspoon of garlic powder for the fresh cloves. Just keep the additional garlic powder in the recipe for maximum garlicky goodness.
Step-by-Step Instructions
Preparing Your Oven and Pan
Start by preheating your oven to 400°F (200°C). This temperature is the sweet spot for chicken drumsticks—hot enough to crisp the skin without drying out the meat. While the oven heats, line a large baking sheet with aluminum foil for easy cleanup. Lightly grease the foil with cooking spray or a thin layer of oil to prevent sticking.
For the crispiest results, place a wire rack on top of your prepared baking sheet. This allows hot air to circulate completely around each drumstick, creating even browning and preventing soggy bottoms. If you don’t have a rack, the drumsticks will still turn out delicious—just make sure to turn them during baking.
Prepping the Chicken
Pat each drumstick thoroughly dry with paper towels. This step is crucial for achieving crispy skin, as any excess moisture will steam the chicken rather than allowing it to brown properly. Take a few extra seconds here—it makes a noticeable difference in the final texture.
Creating the Coating
In a large mixing bowl, combine the olive oil or melted butter with the minced garlic. Whisk them together until well blended, then add the grated Parmesan cheese, garlic powder, Italian seasoning, paprika, salt, and black pepper. Stir everything together until you have a thick, fragrant paste. The mixture should be slightly chunky from the cheese and herbs—this texture helps it cling to the chicken.
Coating the Drumsticks
Add all the drumsticks to the bowl with your garlic Parmesan mixture. Using your hands or tongs, toss the chicken thoroughly until every piece is evenly coated. Don’t be afraid to really work the mixture into the skin, getting into all the nooks and crannies. The more coating that adheres to the chicken, the more flavorful and crispy your final result will be.
Arranging for Baking
Place the coated drumsticks on your prepared baking sheet or rack, leaving at least an inch of space between each piece. Overcrowding the pan traps steam and prevents proper browning, so give each drumstick room to breathe. If necessary, use two baking sheets rather than cramming everything onto one.
Baking to Perfection
Slide the baking sheet into your preheated oven and bake for 35–40 minutes. Set a timer for the halfway point (around 17–20 minutes) and turn each drumstick over to ensure even browning on all sides. The chicken is done when the skin is golden brown and crispy, and the internal temperature reaches 165°F (74°C) when measured with a meat thermometer inserted into the thickest part without touching bone.
For an extra-crispy finish, turn your oven to broil during the last 2–3 minutes of cooking. Watch carefully during this step, as the high heat can quickly go from perfectly crispy to burnt. Keep the oven door slightly ajar and don’t walk away.
Final Touches
Remove the drumsticks from the oven and immediately sprinkle them with fresh chopped parsley and additional Parmesan cheese if desired. The residual heat will slightly melt the cheese, creating an extra layer of flavor. Let the chicken rest for 3–5 minutes before serving—this allows the juices to redistribute throughout the meat.
Tips for Success
The key to ultra-crispy skin is twofold: dry chicken and proper airflow. Beyond patting the drumsticks dry, you can also refrigerate them uncovered for 30 minutes before coating. This additional drying time helps moisture evaporate from the skin’s surface. When baking, using a wire rack ensures heat reaches all sides of the chicken simultaneously.
If your family prefers spicier food, add 1/4 teaspoon of cayenne pepper or red pepper flakes to the coating mixture. For a smokier flavor profile, increase the paprika to a full teaspoon or use smoked paprika instead.
Don’t skip the turning step during baking. While it adds an extra minute of work, flipping the drumsticks ensures both sides develop that beautiful golden-brown color and crispy texture.
Serving Suggestions
These garlic Parmesan drumsticks pair wonderfully with classic comfort sides. Try them with creamy mashed potatoes, buttery corn on the cob, or a fresh garden salad with vinaigrette. For a complete Italian-inspired meal, serve them alongside garlic bread and roasted vegetables tossed with balsamic glaze.
The drumsticks also make excellent meal prep. Store cooked chicken in airtight containers in the refrigerator for up to 4 days. Reheat them in a 350°F oven for 10–12 minutes to restore some of the crispiness, or enjoy them cold straight from the fridge.
Storage and Reheating
Store leftover drumsticks in an airtight container in the refrigerator for up to 4 days. To reheat while maintaining texture, place them on a baking sheet in a 350°F oven for about 15 minutes. Avoid microwaving if possible, as it will make the skin rubbery.
These drumsticks also freeze beautifully. Allow them to cool completely, then freeze in freezer-safe bags for up to 3 months. Thaw overnight in the refrigerator before reheating in the oven.