Chocolate Chip Cookie Pie: Where Cookies Meet Pie Perfection
Close your eyes and picture this: the warm, buttery scent of chocolate chip cookies fresh from the oven, mingling with the comforting appeal of a homemade pie. This Chocolate Chip Cookie Pie delivers exactly that magical experience—a dessert that bridges two beloved classics into one extraordinary creation. It’s the kind of treat that makes guests pause mid-conversation, fork suspended in air, as they savor that first incredible bite.
What makes this recipe truly special is its delightful simplicity. You don’t need professional pastry skills or hours of preparation time. With basic pantry staples and straightforward techniques, you’ll create a dessert that tastes like it came from an upscale bakery. The result is a golden-crusted masterpiece with a soft, gooey center studded with melted chocolate chips—pure comfort food elevated to celebration-worthy status.
This pie works beautifully for countless occasions. Bring it to family gatherings and watch it disappear within minutes. Serve it at dinner parties as your signature dessert. Make it on lazy Sunday afternoons when you want to fill your home with warmth and sweetness. It’s equally perfect for potlucks, bake sales, or those moments when only something truly indulgent will do.
Ingredients You’ll Need
1/2 cup Butter – The cornerstone of this recipe, butter provides richness, moisture, and that irresistible flavor that makes every bite memorable. Use unsalted butter for better control over the salt content, or salted if that’s what you have on hand.
1 cup Brown Sugar – This isn’t just any sweetener. Brown sugar brings deep, molasses-rich notes that create complexity and contribute to the pie’s signature chewy texture. The moisture in brown sugar also keeps the pie tender for days.
1 Egg – Beyond binding the ingredients together, the egg adds structure and helps achieve that perfect balance between cakey and fudgy. Make sure it’s at room temperature for optimal mixing.
1 tsp. Vanilla Extract – A small amount that makes a tremendous impact, vanilla rounds out the flavors and adds aromatic warmth that complements the chocolate beautifully.
1 cup All-Purpose Flour, sifted – The foundation of your pie’s structure. Sifting removes lumps and aerates the flour, ensuring a tender crumb rather than a dense, heavy texture.
1/2 tsp. Baking Powder – This leavening agent provides gentle lift, creating a light texture while maintaining that characteristic cookie-pie density we’re after.
1/2 tsp. Salt – Never underestimate salt’s power in desserts. It amplifies sweetness, enhances chocolate flavor, and creates balance that prevents the pie from tasting one-dimensional.
1/8 tsp. Baking Soda – Working alongside the baking powder, this tiny amount contributes to browning and helps achieve the ideal tender-chewy texture.
3/4 cup Chocolate Chips – The stars of the show. Semi-sweet chips are traditional, but feel free to experiment with milk chocolate for extra sweetness or dark chocolate for sophisticated intensity.
Step-by-Step Instructions
Getting Started
Begin by positioning your oven rack in the center and preheating to 350°F (175°C). This moderate temperature ensures even baking—hot enough to set the structure but gentle enough to keep the center delightfully soft and gooey.
While the oven heats, prepare your pan. A standard 9-inch pie plate works perfectly, but an 8×8 or 9×9 square baking pan delivers equally delicious results with slightly different presentation. Coat your chosen vessel generously with butter or non-stick spray, paying special attention to corners and edges where the batter might stick.
Place your butter in a microwave-safe bowl and melt it completely, either in 15-second microwave bursts or in a small saucepan over low heat. Once melted, set it aside to cool for about 5 minutes. This cooling period is crucial—adding hot butter directly to sugar can affect texture, and adding it to the egg might cook it prematurely.
Creating the Batter
In a large mixing bowl, combine your slightly cooled melted butter with the brown sugar. Use a whisk or wooden spoon to blend them thoroughly, stirring until the mixture becomes smooth and glossy. You’ll notice the sugar beginning to dissolve into the butter, creating a thick, caramel-colored base that’s already fragrant and promising.
Add the vanilla extract to this butter-sugar mixture, stirring to distribute it evenly. The vanilla’s aroma will bloom immediately, filling your kitchen with sweetness. Now crack your egg into the bowl and beat it in completely, mixing until no streaks of egg remain and the batter appears uniform and silky.
Here comes the flour integration, a step that requires a gentle hand. Add your sifted flour to the wet ingredients along with the baking powder, salt, and baking soda. Using a spatula or wooden spoon, fold these dry ingredients into the wet mixture with deliberate, careful strokes. Mix just until you no longer see dry flour pockets—overmixing develops gluten and can turn your tender pie tough and cake-like.
The finished batter will be thick, almost like a dense cookie dough, but pourable enough to spread in your pan. It should hold its shape slightly when you lift your spoon, similar to a thick brownie batter.
Assembly and Baking
Transfer your batter to the prepared pan, using your spatula to spread it evenly to all edges. The batter won’t fill the pan very high—this is normal and expected. Aim for an even layer about half an inch thick, smoothing the top surface so it bakes uniformly.
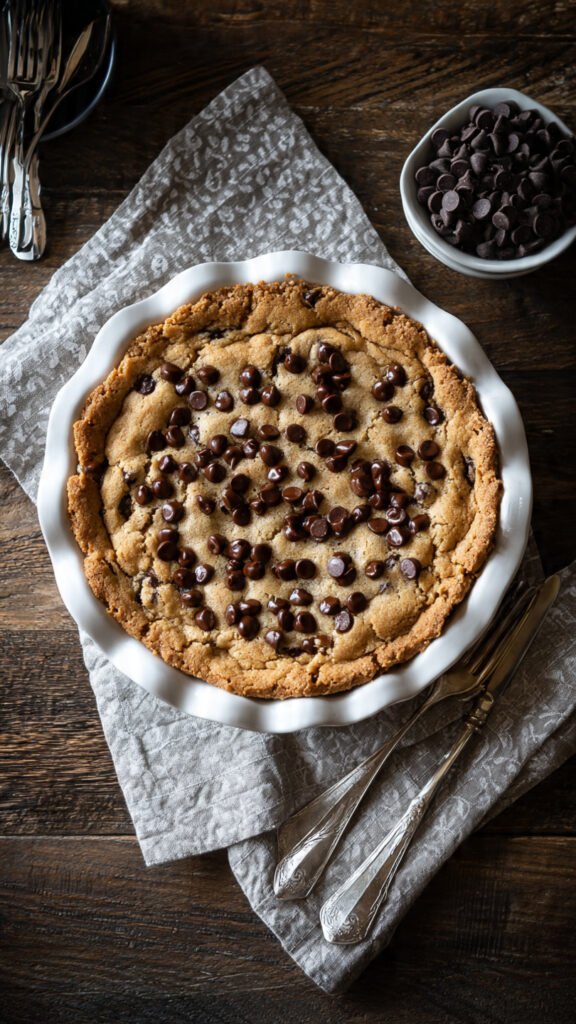
Now for the fun part: scatter those chocolate chips across the entire surface of the batter. Some will sink slightly into the batter, while others will rest on top—both positions are perfect. Don’t press them in; just let them fall naturally for the most appealing presentation and texture distribution.
Slide your pan into the preheated oven and set your timer for 20 minutes. After 20 minutes, check for doneness. The pie should appear golden brown around the edges with a slightly lighter center. The top will look set rather than wet, though it might still feel soft when gently pressed. A toothpick inserted near the center should come out with a few moist crumbs—completely clean means overbaked.
If it needs more time, continue baking in 2-3 minute increments, checking frequently. Baking times vary based on your pan size, oven accuracy, and altitude. A 9×9 pan typically needs 23-25 minutes, while a pie plate might need the full 25 minutes or occasionally a minute or two longer.
Cooling and Serving
Once baked, remove your masterpiece from the oven and place it on a cooling rack. This is perhaps the hardest part—waiting while incredible aromas fill your kitchen. Allow at least 10-15 minutes of cooling time. This brief rest lets the structure set slightly, making slicing cleaner and preventing burns from molten chocolate.
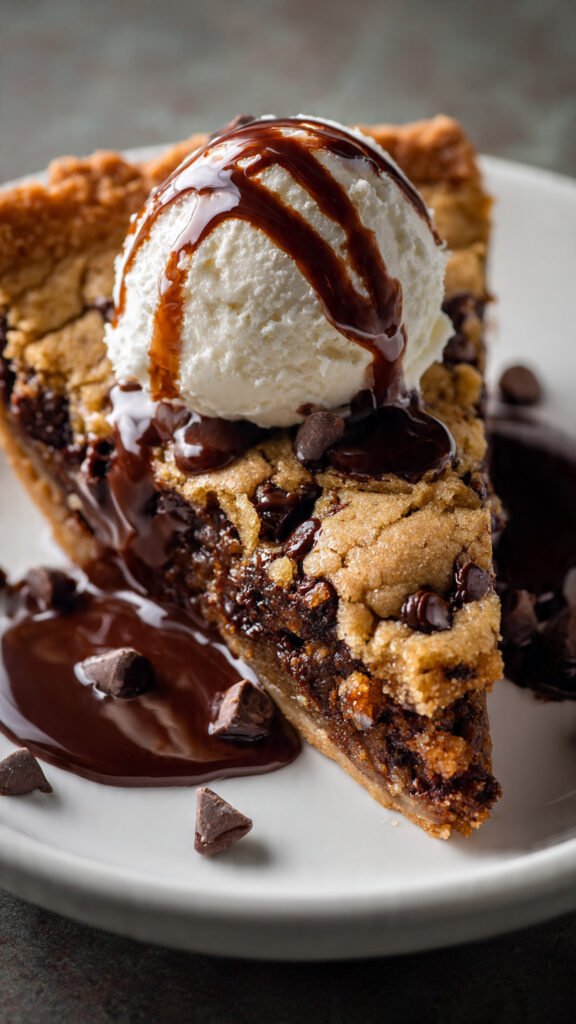
For serving, cut into wedges if using a pie plate, or squares if using a rectangular pan. The ideal portion size is about 1/8 of the total pie, though appetites vary and this pie is definitely worth a generous slice.
The serving possibilities are endless. Serve it warm—this is when it’s at its absolute peak, with chocolate chips still melty and the texture at its most comforting. Add a scoop of vanilla ice cream that begins melting the moment it touches the warm pie, creating creamy pools that mingle with chocolate. Whipped cream offers a lighter alternative, its cool fluffiness contrasting beautifully with the rich, warm pie.
For special presentations, drizzle with caramel or chocolate sauce, dust with powdered sugar, or serve alongside fresh berries for a pop of tartness that cuts through the sweetness. Coffee or cold milk makes the perfect beverage pairing, complementing the rich chocolate and butter notes.
Expert Tips for Success
The choice of brown sugar over white isn’t merely about sweetness—it fundamentally changes the pie’s character. Brown sugar contains molasses, which adds moisture retention properties that keep your pie soft and chewy even the next day. It also contributes caramel undertones that add sophistication to what might otherwise be a simple chocolate chip flavor profile.
Sifting flour might seem old-fashioned or unnecessary, but this small step prevents lumps and aerates the flour, leading to a more tender final product. If you don’t own a flour sifter, use a fine-mesh strainer held over your mixing bowl, gently tapping the side to shake flour through.
When measuring flour, use the spoon-and-level method rather than scooping directly with your measuring cup. Scooping packs flour into the cup, leading to as much as 25% more flour than the recipe intends, which results in a dry, tough pie.
Room temperature ingredients mix more smoothly and completely. If you forget to remove your egg from the refrigerator in advance, place it in a bowl of warm water for 5 minutes to take off the chill.
For chocolate chip selection, consider your audience. Semi-sweet chips provide balanced sweetness that appeals to most palates. Milk chocolate chips create a sweeter, more nostalgic flavor reminiscent of childhood cookies. Dark chocolate chips (60-70% cacao) offer sophisticated depth with less sweetness. You can even mix varieties for complexity—try half semi-sweet and half white chocolate for visual appeal and flavor contrast.
Don’t overbake—this is the single most important tip for this recipe. The pie continues cooking slightly from residual heat after you remove it from the oven. What looks slightly underdone will be perfect after cooling. An overbaked cookie pie becomes dry and cake-like rather than soft and gooey.
Storage is simple: cover cooled pie with plastic wrap or aluminum foil and keep at room temperature for up to three days. The pie actually improves after a day as flavors meld and meld. For longer storage, refrigerate for up to a week or freeze for up to three months. Reheat individual slices in the microwave for 15-20 seconds to restore that fresh-baked texture.
Nutritional Information and Variations
At approximately 419 calories per serving (based on 8 servings), this pie is definitely an indulgent treat. Each slice contains butter, sugar, and chocolate—all the components of pure dessert bliss. While not an everyday health food, it’s perfect for special occasions and celebrations where memorable flavor takes priority.
For dietary modifications, gluten-free all-purpose flour works beautifully as a 1:1 substitution. Ensure your baking powder and chocolate chips are also certified gluten-free. The texture remains remarkably similar to the original.
Dairy-free versions are achievable using vegan butter alternatives and dairy-free chocolate chips. The flavor profile shifts slightly, but the results are still delicious.
For flavor variations, consider adding 1/2 cup chopped walnuts or pecans for crunch and nutty richness. Stir in 1/4 cup peanut butter with the wet ingredients for a peanut butter chocolate sensation. Replace half the chocolate chips with butterscotch or white chocolate chips for variety. Add a teaspoon of espresso powder to intensify chocolate flavor without adding coffee taste.
This Chocolate Chip Cookie Pie represents dessert-making at its most satisfying—simple ingredients, straightforward technique, and spectacular results that never fail to impress. Whether you’re baking for a crowd or treating yourself, this recipe delivers comfort, nostalgia, and pure delicious joy in every single bite.