Copycat Raising Cane’s Chicken Tenders (With Signature Cane’s Sauce!)
There’s something irresistible about Raising Cane’s chicken tenders—that perfectly golden, crunchy exterior giving way to impossibly juicy, tender chicken inside, all paired with the legendary Cane’s sauce that has fans hoarding extra packets. The simplicity of the menu, focusing solely on quality chicken fingers done right, has turned this Louisiana-born chain into a national obsession with devoted fans lining up for their signature combo.
I became determined to crack the code on these tenders after realizing how often I was making the drive-thru run just to satisfy that specific craving. Through countless batches and careful observation, I discovered the secrets: a buttermilk marinade that tenderizes and flavors, a seasoned flour coating with just the right spice balance, and most importantly, that tangy, peppery Cane’s sauce that makes everything better. The homemade version costs a fraction of the price and tastes remarkably close to the original.
Expect chicken tenders with a shatteringly crisp coating that stays crunchy, meat so juicy it practically melts, and a creamy, slightly spicy dipping sauce that you’ll want to put on everything. With just a few hours of marinating time and about 20 minutes of active cooking, you can recreate this fast-food favorite in your own kitchen with better ingredients and total control over seasoning levels.
Table of Contents
Recipe Quick Reference Module
Time Breakdown: Prep: 15 minutes | Marinate: 2-12 hours | Active: 20 minutes | Total: 2 hours 35 minutes (minimum)
Output: 4-6 servings (about 8-10 tenders) | Skill Level: Beginner to Intermediate
At-a-Glance Details:
- Origin cuisine: American Southern / Louisiana Fast Food Copycat
- Meal category: Dinner, Lunch, Game Day, Kids’ Favorite
- Dietary tags: Can be made in air fryer for lower fat
- Ideal occasion: Family dinners, game day parties, kids’ meals, casual gatherings
Value Proposition Points
- Fast-food quality at home — Delivers that signature Raising Cane’s crunch and juiciness using better-quality chicken you choose yourself
- Budget-friendly — Costs 60-70% less than ordering out while making enough to feed the whole family
- Iconic Cane’s sauce included — The famous tangy, peppery dipping sauce that fans obsess over, made in 5 minutes
- Marinate and forget — Most work is hands-off marinating time; actual cooking takes just 20 minutes
- Kid-approved favorite — Even picky eaters love these crispy, flavorful tenders with the mild spice level
Featured Ingredient Analysis
Buttermilk Marinade: The tangy, acidic buttermilk is essential for creating Raising Cane’s signature tender, juicy texture. The lactic acid in buttermilk breaks down proteins in the chicken, making it incredibly tender while adding subtle tang that balances the richness. Use full-fat buttermilk for best flavor; if unavailable, make a quick substitute by adding 1 tablespoon white vinegar or lemon juice to 1 cup whole milk and letting it sit 10 minutes.
Cornstarch in Coating: The combination of flour and cornstarch creates the characteristic extra-crispy, almost shattery crust that sets Cane’s apart from regular fried chicken. Cornstarch absorbs less oil and creates a lighter, crispier coating than flour alone. The ratio of approximately 5 parts flour to 1 part cornstarch is crucial; too much cornstarch makes the coating tough and dry.
Worcestershire Sauce in Cane’s Sauce: This umami-rich ingredient is the secret to the sauce’s complex, savory-tangy depth that goes beyond simple mayo and ketchup. It adds a subtle fermented, slightly anchovy-like background note that makes the sauce addictive. Don’t skip this—it’s what separates authentic Cane’s sauce from generic “fry sauce”; Lea & Perrins is the standard brand.
Component-Based Ingredient Lists
Primary Component [Chicken Tenders & Marinade]:
- 2 pounds chicken tenderloins (or 4 large chicken breasts cut into strips)
- 1½ cups buttermilk
- 1 large egg
- 1 tablespoon Cajun seasoning (or 1 tablespoon garlic powder + 1 teaspoon paprika)
- 2 teaspoons kosher salt (divided)
- 1 teaspoon black pepper
- 1 teaspoon garlic powder
Secondary Component [Breading Mixture]:
- 2½ cups all-purpose flour
- ½ cup cornstarch
- 1½ teaspoons paprika
- 1 tablespoon garlic powder
- 1 tablespoon onion powder
- 3 teaspoons kosher salt
- 1 teaspoon black pepper
- ½ teaspoon cayenne pepper (optional, for mild heat)
- Vegetable oil or peanut oil for frying (about 6-8 cups)
Tertiary Component [Signature Cane’s Sauce]:
- ¾ cup mayonnaise (Duke’s or Hellmann’s recommended)
- ⅓ cup ketchup
- 1½ tablespoons Worcestershire sauce
- 1 teaspoon garlic powder
- 1 teaspoon black pepper
- ½ teaspoon kosher salt
- ¼ teaspoon cayenne pepper (optional)
Ingredient Intelligence:
- Premium quality crucial for: Chicken tenderloins (fresh, not frozen for best texture), buttermilk (full-fat), mayonnaise (quality brand), Worcestershire sauce
- Temperature requirements: Chicken should be cold from marinade when breading; oil must reach 350°F (175°C) for proper frying; sauce ingredients at room temperature
- Non-negotiable elements: Buttermilk marinade (creates signature tenderness), cornstarch in breading (essential for crispiness), Worcestershire in sauce (defines Cane’s flavor)
Tool & Equipment Section
Required Items:
- Large bowl or gallon-size zip-top bag — For marinating chicken in buttermilk mixture
- Heavy-bottomed pot or Dutch oven — At least 5-quart capacity for deep frying with oil 2-3 inches deep
- Shallow dish or pie plate — For flour mixture breading station
- Wire rack over baking sheet — For draining fried chicken and keeping crispy
- Deep-fry or instant-read thermometer — Essential for maintaining proper oil temperature
Bonus Tools:
- Spider strainer or slotted spoon — Makes removing chicken from hot oil safer and easier
- Paper towels — For extra draining if wire rack isn’t available
- Tongs — For turning chicken while frying without piercing the coating
Preparation Method (Detailed Steps)
Step 1: Make the Cane’s Sauce
In a medium bowl, whisk together mayonnaise, ketchup, Worcestershire sauce, garlic powder, black pepper, salt, and cayenne if using. Mix thoroughly until completely smooth and uniform in color with no streaks—the sauce should be creamy, slightly thick, and pale orange-pink. Taste and adjust seasoning if needed, adding more Worcestershire for tang, pepper for bite, or salt for balance. Cover and refrigerate while preparing chicken; flavors will meld and improve as it sits, and it can be made up to 5 days ahead.
Pro tip: The sauce should have a noticeable pepper kick and savory depth from the Worcestershire—it’s not meant to be sweet like typical “fry sauce.”
Step 2: Marinate the Chicken
In a large bowl or gallon-size zip-top bag, whisk together buttermilk, egg, Cajun seasoning (or garlic powder and paprika), 2 teaspoons salt, black pepper, and garlic powder until well combined. Add chicken tenderloins and turn to coat completely—every piece should be submerged in the marinade. Cover bowl with plastic wrap or seal bag, removing as much air as possible. Refrigerate for at least 2 hours and up to 12 hours (overnight is ideal)—the longer marinating time produces more tender, flavorful chicken.
Pro tip: Marinating overnight gives restaurant-quality tenderness and allows the buttermilk to fully penetrate and tenderize the chicken fibers.
Step 3: Prepare the Breading Station
In a large shallow bowl or pie plate, whisk together flour, cornstarch, paprika, garlic powder, onion powder, 3 teaspoons salt, black pepper, and cayenne if using. Mix thoroughly so spices are evenly distributed throughout the flour—there should be no pockets of pure spice or plain flour. The mixture should smell fragrant and look slightly beige from the spices. Set the breading station near your fridge for easy access to marinated chicken.
Step 4: Bread the Chicken (Double-Dip Method)
Working with one tender at a time, remove chicken from buttermilk marinade and let excess drip off for 2-3 seconds but keep chicken slightly wet. Dredge in flour mixture, pressing firmly to coat all surfaces and get flour into every crevice. Shake off excess gently, then dip back into the buttermilk marinade briefly (2 seconds), and dredge again in flour mixture, pressing firmly to create a thick, craggy coating. Place breaded tenders on a wire rack or parchment-lined baking sheet. Repeat with all chicken pieces—the double-dredge creates extra crunch and thick coating.
Pro tip: Let breaded chicken rest on the rack for 10-15 minutes before frying; this allows coating to set and adhere better, preventing it from falling off during frying.
Step 5: Heat the Oil and Set Up Draining Station
Pour oil into a heavy-bottomed pot or Dutch oven to a depth of 2-3 inches (you need enough to submerge tenders but leave 3-4 inches headspace to prevent overflow). Heat oil over medium-high heat to exactly 350°F (175°C), monitoring with a thermometer—this temperature is crucial for crispy coating without greasiness. Set up a wire rack over a baking sheet lined with paper towels near the stove for draining fried chicken.
Pro tip: Test oil temperature by dropping a pinch of flour mixture into the oil; it should sizzle vigorously and rise immediately but not smoke.
Step 6: Fry the Chicken Tenders
Carefully lower 3-4 tenders into the hot oil, working in batches to avoid overcrowding which drops oil temperature. Fry for 5-7 minutes total, turning once halfway through, until coating is deep golden brown and internal temperature reaches 165°F (74°C). The tenders should be uniformly golden with a crispy, bubbled surface. Use a spider strainer or slotted spoon to transfer to the wire rack. Let oil return to 350°F between batches before adding more chicken—this ensures consistent crispiness.
Pro tip: Don’t crowd the pot—frying too many pieces at once lowers oil temperature, resulting in greasy, soggy coating instead of crispy crunch.
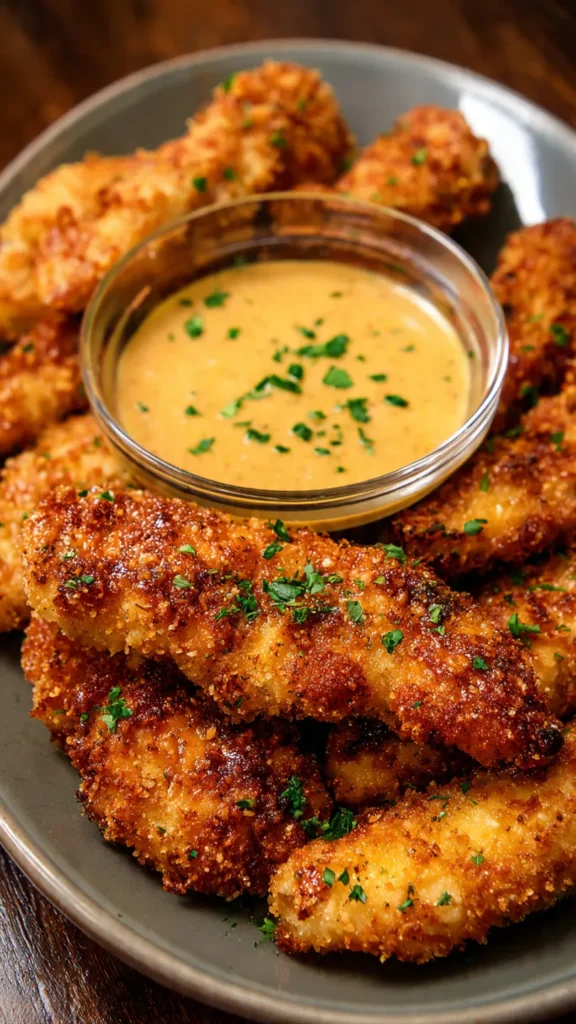
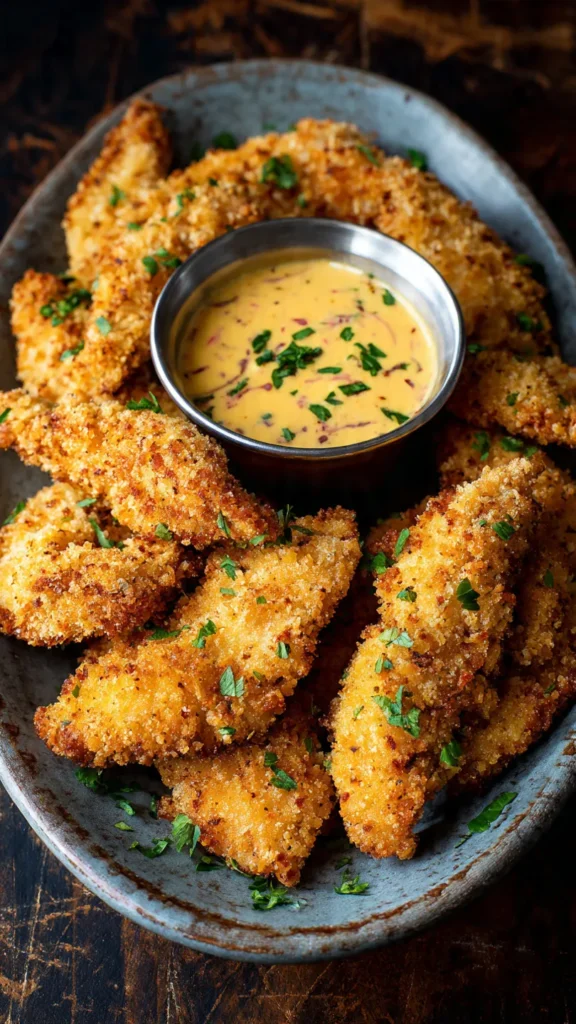
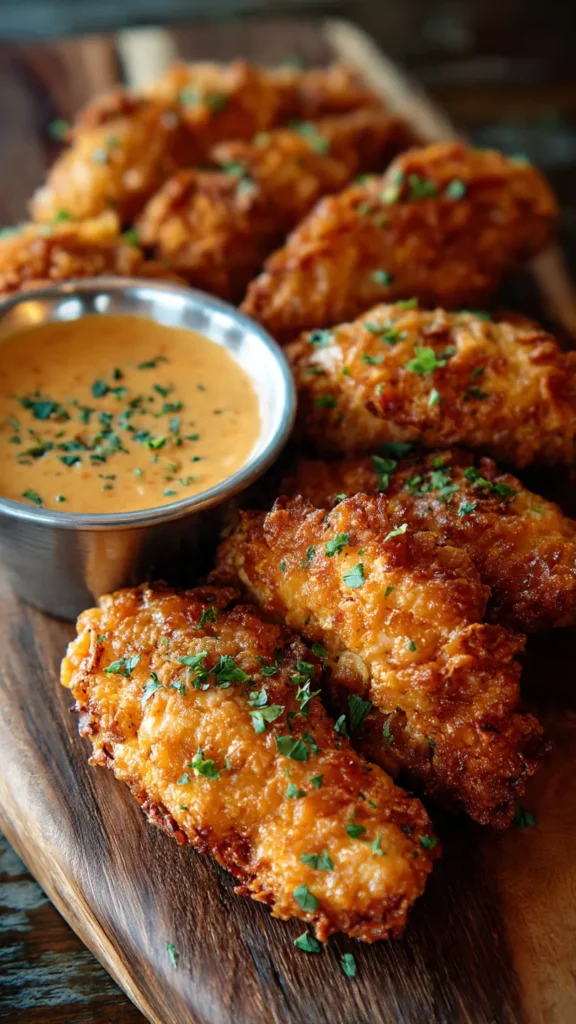
Step 7: Drain and Serve
Let fried chicken tenders rest on the wire rack for 2-3 minutes to drain excess oil and allow coating to crisp up fully as steam escapes. The resting also allows internal juices to redistribute for maximum tenderness. Serve immediately while hot and crispy with generous portions of Cane’s sauce for dipping. Garnish platter with lemon wedges and extra black pepper if desired, and offer additional sauce on the side—you can never have too much.
Professional Guidance Section
Temperature Control: Maintain oil at consistent 350°F (175°C)—use a thermometer and adjust heat as needed; too low produces greasy, soggy chicken while too high burns coating before chicken cooks through.
Timing Patience: Don’t rush the marinating time—minimum 2 hours is required for tenderness, but overnight marinating produces the most authentic Cane’s-like texture and flavor penetration.
Coating Adhesion Secret: The double-dip method (flour, buttermilk, flour again) creates the signature thick, craggy coating with maximum crunch that stays attached during frying.
Avoid This Error: Never pierce chicken with a fork while frying or turning—this releases precious juices and makes the meat dry; use tongs or a spider strainer that grabs the coating instead.
Testing Insight: Through testing multiple batches, I found that letting the breaded chicken rest 10-15 minutes before frying dramatically improves coating adhesion and creates a crispier, more even crust.
Adaptation & Variation Guide
Dietary Adjustments:
Air Fryer Version: After breading, spray tenders lightly with cooking spray and air fry at 400°F (200°C) for 12-15 minutes, flipping halfway, until golden and 165°F internal temperature (reduces oil and calories by 60-70% while maintaining crispiness).
Gluten-Free Conversion: Replace all-purpose flour with gluten-free 1-to-1 baking flour and ensure cornstarch is certified gluten-free; use gluten-free Worcestershire sauce in the Cane’s sauce (Lea & Perrins is naturally gluten-free).
Spicier Version: Double the cayenne pepper in both marinade and breading, add ½ teaspoon hot sauce to buttermilk marinade, and mix 1 teaspoon hot sauce into Cane’s sauce for heat lovers.
Flavor Transformations:
Nashville Hot Style: After frying, brush tenders with mixture of 3 tablespoons cayenne pepper, 2 tablespoons brown sugar, and ¼ cup reserved frying oil for spicy, sweet heat coating.
Lemon Pepper Variation: Add 2 tablespoons lemon zest and 1 tablespoon cracked black pepper to breading mixture; serve with lemon wedges and garlic butter dipping sauce.
Extra Crispy Coating: Add ¼ cup fine breadcrumbs or panko to the flour mixture for even more texture and crunch in the coating.
Presentation Approaches:
Classic Method: Serve tenders on parchment-lined basket or plate with generous ramekin of Cane’s sauce, Texas toast, crinkle-cut fries, and coleslaw for authentic combo meal.
Contemporary Style: Arrange on wooden board with multiple dipping sauces (Cane’s sauce, honey mustard, ranch, BBQ) and fresh garnishes for entertaining.
Entertaining Format: Set up a “tender bar” with warm tenders in chafing dish, multiple sauce options, and sides like fries, coleslaw, and biscuits for parties.
Preservation & Advance Prep
Prepare-Ahead Strategy:
- Cane’s sauce: Make up to 5 days ahead; store refrigerated in airtight container—flavor improves with time
- Marinate chicken: Prepare buttermilk marinade and soak chicken up to 12 hours (overnight) ahead for best tenderness
- Bread chicken: Coat tenders up to 2 hours ahead, place on rack, cover loosely with plastic wrap, and refrigerate until ready to fry
- Maximum advance time: Fried tenders are best fresh, but can be held in 200°F (93°C) oven on wire rack up to 30 minutes while frying additional batches
Storage Guidelines:
Refrigerated: Store leftover fried tenders in airtight container up to 3 days; coating will soften but flavor remains good—reheat properly to restore some crispiness.
Frozen: Freeze fully cooked, cooled tenders in single layer on baking sheet until solid, then transfer to freezer bag with parchment between layers for up to 2 months; sauce does not freeze well due to mayonnaise base.
Optimal Reheating:
Oven method (best): Preheat to 400°F (200°C), place tenders on wire rack over baking sheet, heat 12-15 minutes until warmed through and coating crisps up—this method best restores crunch.
Air fryer method (fast): Heat at 375°F (190°C) for 5-7 minutes, flipping halfway, until hot and crispy exterior is restored.
Microwave (emergency only): Heat 30-45 seconds on high; coating will be soft and chewy, not crispy, but acceptable when time is critical.
Complementary Serving Suggestions
Ideal Pairings:
- Crinkle-cut French fries — Classic Raising Cane’s combo side; season with salt and serve with extra Cane’s sauce for dipping
- Texas toast — Buttered, grilled thick-sliced white bread brushes with garlic butter is the signature Cane’s side
- Creamy coleslaw — Tangy, cool slaw provides refreshing crunch and balances the richness of fried chicken
Menu Building:
- Complete Cane’s Combo at Home: Serve tenders with crinkle fries, Texas toast, coleslaw, and Cane’s sauce with sweet tea or lemonade for full experience
- Game Day Spread: Pair with buffalo wings, mozzarella sticks, loaded nachos, and multiple dipping sauces for crowd-pleasing variety
- Kids’ Meal: Serve 2-3 tenders with simple sides like apple slices, carrot sticks, and chocolate milk for child-friendly dinner
Nutritional Information (Per Serving – about 2 tenders with 2 tablespoons sauce)
Calories: 520 | Protein: 38g | Carbohydrates: 42g | Fat: 22g | Fiber: 2g | Sugar: 4g | Sodium: 920mg
Disclaimer: Calculated using USDA nutritional database for standard ingredients. Actual values vary based on specific brands, oil absorption during frying, and portion sizes. Air fryer version reduces fat by approximately 60%.
Reader FAQ Module
Q: Can I make this without buttermilk?
A: Yes, make a substitute by mixing 1½ cups whole milk with 1½ tablespoons white vinegar or lemon juice; let sit 10 minutes before using in marinade.
Q: My coating fell off during frying—what went wrong?
A: Either oil wasn’t hot enough (needs to be 350°F), chicken was too wet when breading, or you skipped the double-dip method; also make sure to let breaded chicken rest 10-15 minutes before frying.
Q: What’s the best oil temperature for frying chicken tenders?
A: Exactly 350°F (175°C) is ideal—use a thermometer and adjust heat to maintain this temperature; too low = greasy, too high = burnt outside with raw inside.
Q: How do I keep fried chicken crispy while making multiple batches?
A: Place finished tenders on wire rack in 200°F (93°C) oven—never stack or cover with foil, which traps steam and makes coating soggy.
Q: Can I bake these instead of frying?
A: Baking won’t achieve the same crispiness, but for a healthier option use an air fryer at 400°F for 12-15 minutes, flipping halfway and spraying with oil.
Q: The Cane’s sauce tastes different from the restaurant—why?
A: Adjust ratios to taste—add more Worcestershire for tang, more pepper for bite, or a pinch of MSG for umami depth that replicates restaurant seasoning.
Background & Heritage Context
Raising Cane’s Chicken Fingers was founded in 1996 in Baton Rouge, Louisiana, by Todd Graves, who had a singular vision: perfect chicken fingers and nothing else. The name honors Graves’ yellow Labrador retriever, Raising Cane I, and the restaurant’s focused menu reflected his belief that doing one thing exceptionally well beats offering mediocre variety. This counter-intuitive business model—limiting the menu to just chicken fingers, fries, coleslaw, Texas toast, and that signature sauce—became the chain’s greatest strength.
The Cane’s sauce, which fans consider almost as important as the chicken itself, was developed to complement the simple, perfectly fried tenders. While the exact recipe remains a closely guarded secret, most copycat versions center on the combination of mayonnaise, ketchup, Worcestershire sauce, and black pepper with garlic powder—a tangy, savory, slightly peppery sauce that’s more complex than standard “fry sauce” or thousand island dressing.
What started as a single location near Louisiana State University has grown into a national phenomenon with hundreds of locations, fueled by word-of-mouth from devoted fans and college students. The chain’s success demonstrates that quality ingredients, consistent execution, and a focused menu can create cult-like loyalty. Raising Cane’s proved that sometimes the best restaurant strategy is mastering the basics: fresh chicken, crispy breading, and a sauce so good people ask for extra cups to take home.
Print-Optimized Recipe Summary
Copycat Raising Cane’s Chicken Tenders with Signature Cane’s Sauce
Crispy, juicy buttermilk-marinated chicken tenders with tangy, peppery dipping sauce—serves 4-6
Ingredients:
Marinade: 2 lbs chicken tenderloins, 1½ cups buttermilk, 1 egg, 1 tbsp Cajun seasoning, 2 tsp salt, 1 tsp each black pepper and garlic powder
Breading: 2½ cups flour, ½ cup cornstarch, 1½ tsp paprika, 1 tbsp each garlic and onion powder, 3 tsp salt, 1 tsp black pepper, ½ tsp cayenne (optional), oil for frying
Sauce: ¾ cup mayo, ⅓ cup ketchup, 1½ tbsp Worcestershire, 1 tsp each garlic powder and black pepper, ½ tsp salt
Method:
- Whisk sauce ingredients; refrigerate
- Mix buttermilk, egg, seasoning, salt, pepper; add chicken, marinate 2-12 hours refrigerated
- Combine flour, cornstarch, all spices in shallow dish
- Remove chicken from marinade, dredge in flour, dip back in buttermilk, dredge in flour again (double-dip)
- Rest breaded chicken 10-15 minutes
- Heat oil to 350°F; fry 3-4 tenders at a time, 5-7 minutes until golden and 165°F internal
- Drain on wire rack; serve hot with Cane’s sauce
Essential Notes: Marinate at least 2 hours (overnight best) | Double-dip for extra crispy coating | Maintain oil at exactly 350°F | Let breaded chicken rest before frying | Don’t crowd the pot | Serve immediately for best crispiness