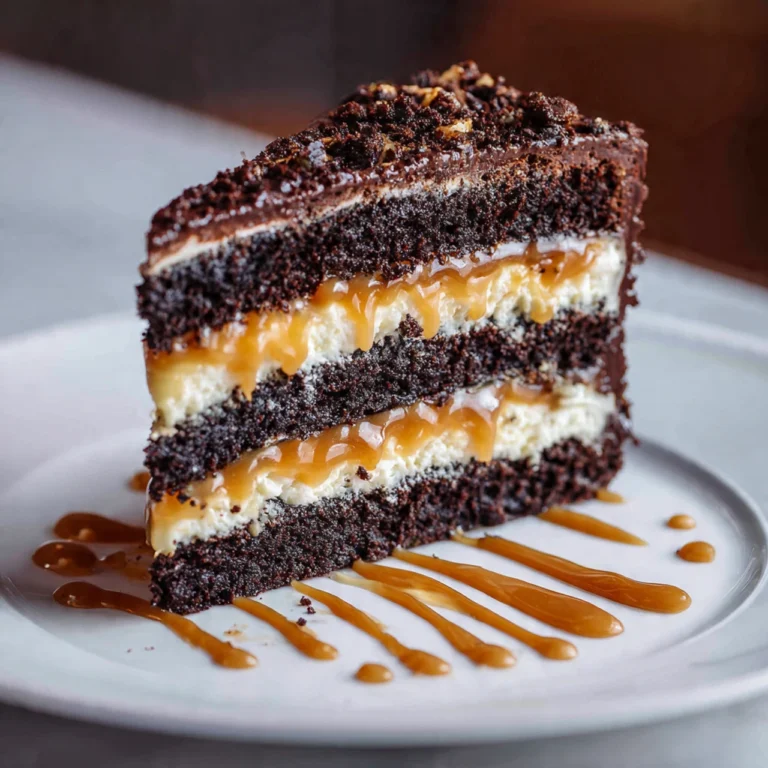
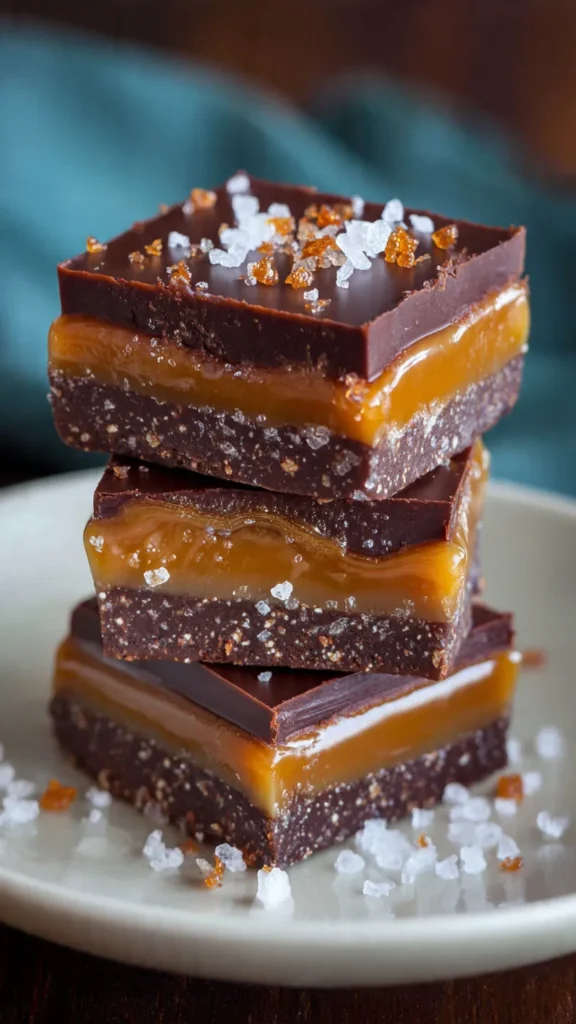
Decadent Salted Caramel Chocolate Bars – Easy Layered Dessert

Salted Caramel Chocolate Bars are the ultimate indulgent dessert that combines three irresistible layers: a buttery cookie base, rich gooey caramel, and a blanket of melted dark chocolate topped with flaky sea salt. The perfect balance of sweet and salty creates an addictive flavor combination that’s impossible to resist.
These bars are surprisingly easy to make and look absolutely stunning, making them ideal for potlucks, bake sales, holiday gift boxes, or whenever you need an impressive dessert that doesn’t require professional baking skills. The contrast between the crisp cookie crust, chewy caramel center, and smooth chocolate topping delivers textural perfection in every bite.
Recipe Quick Facts
Prep Time: 20 minutes
Cook Time: 50-55 minutes
Total Time: 2 hours (including cooling/setting time)
Servings: 24 bars
Difficulty Level: Medium
Cuisine Type: American
Course: Dessert
Dietary Labels: Vegetarian
Why You’ll Love This Recipe
- Three luxurious layers — buttery cookie base, silky caramel, and rich chocolate create the perfect bite
- Sweet and salty perfection — flaky sea salt balances the sweetness and elevates every flavor
- Make-ahead friendly — perfect for preparing in advance for parties and gifts
- Crowd-pleasing dessert — always disappears first at gatherings and bake sales
Ingredients
For the Cookie Base
- 2 cups unsalted butter, softened
- 1½ cups confectioners’ sugar
- 1 cup granulated sugar
- 6 teaspoons vanilla extract
- 4 cups all-purpose flour
- ½ teaspoon salt
For the Caramel Layer
- 1 package (14 oz) caramels, unwrapped
- ⅓ cup heavy whipping cream
- 1 teaspoon kosher salt
For the Chocolate Topping
- 1 package (12 oz) dark chocolate chips
- Large-flaked sea salt, for garnish
Equipment Needed
- 13×9-inch baking pan
- Parchment paper or non-stick spray
- Stand mixer or hand mixer
- Medium saucepan
- Wire cooling rack
- Microwave-safe bowl
- Spatula
- Sharp knife for cutting
Step-by-Step Instructions
- Preheat oven to 325°F and grease a 13×9-inch baking pan with non-stick spray or line with parchment paper.
- Make the cookie base: In a large bowl or stand mixer, beat the softened butter, confectioners’ sugar, granulated sugar, and vanilla until light and fluffy, 5-7 minutes. Gradually beat in the flour and salt, mixing until well combined.
- Form the bottom crust: Press 3 cups of the dough firmly onto the bottom of the prepared pan, creating an even layer. Reserve the remaining dough for the top layer.
- Bake the base: Bake until the crust is set and edges are just beginning to turn golden, 20-22 minutes. Remove from oven and cool on a wire rack for 10 minutes.
- Prepare the caramel layer: While the base cools, combine the unwrapped caramels and heavy cream in a small saucepan. Melt over low heat, stirring constantly, until completely smooth, about 5-7 minutes.
- Assemble the layers: Pour the melted caramel evenly over the cooled cookie crust. Sprinkle the kosher salt over the caramel layer, then scatter the dark chocolate chips evenly on top.
- Add the top layer: Drop the remaining cookie dough by teaspoonfuls randomly over the chocolate chips. Don’t worry about complete coverage—it will spread during baking.
- Final bake: Return the pan to the oven and bake until the top is light golden brown, 30-35 minutes longer.
- Cool and finish: Remove from oven and immediately sprinkle with flaky sea salt. Cool completely on a wire rack (at least 2 hours) before cutting into bars. For the cleanest cuts, refrigerate for 30 minutes before slicing.
Pro Tips for Success
- Use softened butter, not melted — this creates the proper cookie texture for the base
- Don’t skip the cooling time — the base must cool before adding caramel, or it will sink into the crust
- Stir caramel constantly — this prevents scorching and ensures a smooth, creamy texture
- Refrigerate before cutting — cold bars cut much cleaner and the layers stay intact
- Use a hot, clean knife — wipe the knife between cuts and dip in hot water for professional-looking bars
Substitutions & Variations
- Homemade caramel — replace store-bought caramels with 1 cup homemade salted caramel sauce cooked to 250°F for firmer texture
- Milk chocolate version — use milk chocolate chips instead of dark for a sweeter, milder flavor
- Gluten-free — substitute 1:1 gluten-free flour blend for regular all-purpose flour
- Peanut butter twist — add ½ cup peanut butter to the cookie dough and sprinkle chopped peanuts over caramel
- Dairy-free option — use vegan butter, coconut cream, and dairy-free chocolate chips
- Extra chocolate — drizzle melted chocolate over the cooled bars for even more decadence
- Cookie bar style — fold chocolate chips into the entire dough and swirl in caramel for easier preparation

Storage & Make-Ahead Tips
- Room Temperature: Store in an airtight container, layered with parchment paper, for up to 5 days
- Refrigerate: Keep refrigerated for up to 10 days; the bars firm up nicely when chilled
- Freeze: Wrap individual bars in plastic wrap, then place in a freezer bag for up to 3 months; thaw at room temperature
- Reheat: Not necessary, but can warm slightly in microwave for 10-15 seconds for gooey caramel
- Make Ahead: These bars actually improve after 24 hours as the flavors meld together
Serving Suggestions
- Serve at room temperature for softer caramel, or chilled for firmer, cleaner bites
- Pair with vanilla ice cream or fresh whipped cream for an extra-special dessert
- Present on a decorative platter with a dusting of cocoa powder or extra flaky salt
- Package individually in clear cellophane bags tied with ribbon for beautiful homemade gifts
- Serve alongside espresso, coffee, or cold milk to balance the sweetness
Nutrition Information (Per Serving)
Calories: 340 | Protein: 3g | Carbohydrates: 42g | Fat: 18g | Fiber: 1g | Sugar: 30g | Sodium: 180mg
FAQ
1. Can I make this ahead?
Absolutely! These bars actually taste better after 24 hours as the flavors develop. Make them up to 3 days ahead and store in an airtight container.
2. Can I bake instead of fry?
This is a baked dessert, so no frying required! The bars are baked in two stages for perfect texture.
3. What can I substitute for caramels?
You can make homemade caramel sauce cooked to 250°F, or use store-bought caramel sauce (thickened slightly on the stove).
4. How do I know when they’re done?
The bars are ready when the top layer is light golden brown and set. The center may still look slightly soft but will firm up as it cools.
5. Can I freeze leftovers?
Yes! These freeze beautifully for up to 3 months. Wrap individual bars in plastic wrap, then store in a freezer-safe container or bag.
6. How long do they last?
Stored properly in an airtight container, these bars last 5 days at room temperature or up to 10 days refrigerated.
Recipe Notes
Salted Caramel Chocolate Bars represent the perfect marriage of sweet and salty flavors that has become a modern dessert phenomenon. The combination of buttery shortbread, chewy caramel, and rich chocolate has roots in classic candy bar recipes, but the addition of flaky sea salt elevates these bars to gourmet status.
This recipe is incredibly forgiving and versatile—the three-layer structure can be adapted with different chocolates, homemade or store-bought caramel, and various cookie bases. The bars are substantial enough to satisfy serious sweet cravings yet elegant enough to serve at upscale gatherings. They’re particularly popular during the holiday season as gifts, but their universal appeal makes them perfect year-round.